Shutter

Use Panning Technique To Shoot Fast Moving Subjects

Panning is the photography technique which is primarily used to show the motion of the fast moving subject. The basic idea behind the panning is to follow the moving subject with the camera as it crosses your field of view, resulting in the subject being sharp and the rest of the shot including the background image blurred. Relatively sharp subject and the blurry background gives the feeling of the movement and the speed. It’s particularly useful in capturing any fast moving subject like racing cars, running animals, cyclist etc. If you want to master the panning technique, first and most importantly, you have to follow few simple rules and then practice with a lot of patience. Do not get frustrated with some blurry subjects initially. Panning is a skill which can be learned over time but you need to experiment with many variables including your camera settings, your distance with the subject, shutter release timing etc., which we will discuss later. In order to get the good result with panning, the ideal flow would be - maintain a balanced distance with the subject, use a little slower shutter speed, follow the moving subject and pan your camera along with the subject on the same plane of the motion, take the shot and continue to pan in the same direction.

Here are few guidelines you can follow to properly apply panning technique.

1. Use the Shutter Priority Mode.

2. Start from a slower shutter speed (1/15s - 1/30s) and go up or down little bit as you need depending on the speed of the subject and the lighting conditions.

3. Shoot in a Continuous Autofocus Mode because your subject and the camera are constantly moving in proportion to each other. This way camera continuously track and focus the moving subject.

4. If your camera doesn't support autofocus, you have to judge the traveling path of the subject, determine the subject's final point for the shooting and pre-focus on that point and then take the shot.

5. Use a Continuous Shooting Mode or a Burst Mode so that you can have a multiple shots and will have the flexibility to choose the best among many shots.

6. Position yourself parallel in front of the moving subject. If you keep larger distance from the subject, it might decrease the speed of the subject in relation with you and your camera, but it also reduces the effect of panning, and the effect is often why we do the panning. So, you have to balance the distance with the subject and the speed of the panning.

7. Place your subject position fixed in your viewfinder and smoothly move your camera as the subject moves on it's track.

8. Continuously follow the track of the moving subject, take the shot and keep moving the camera as if you are taking a shot. This will create a soft transition and gives better result.

9. If you need an extra support for heavy camera and big lens, you can use a tripod which supports panning feature. It gives extra stability to minimize the motion blur on the main subject.

Panning Technique (Image Credit : AdoramaTV)

Panning Technique (Image Credit : AdoramaTV)

Exposure : 1/30 sec     Aperture : f/14.0     Focal Length : 200mm     ISO : 100

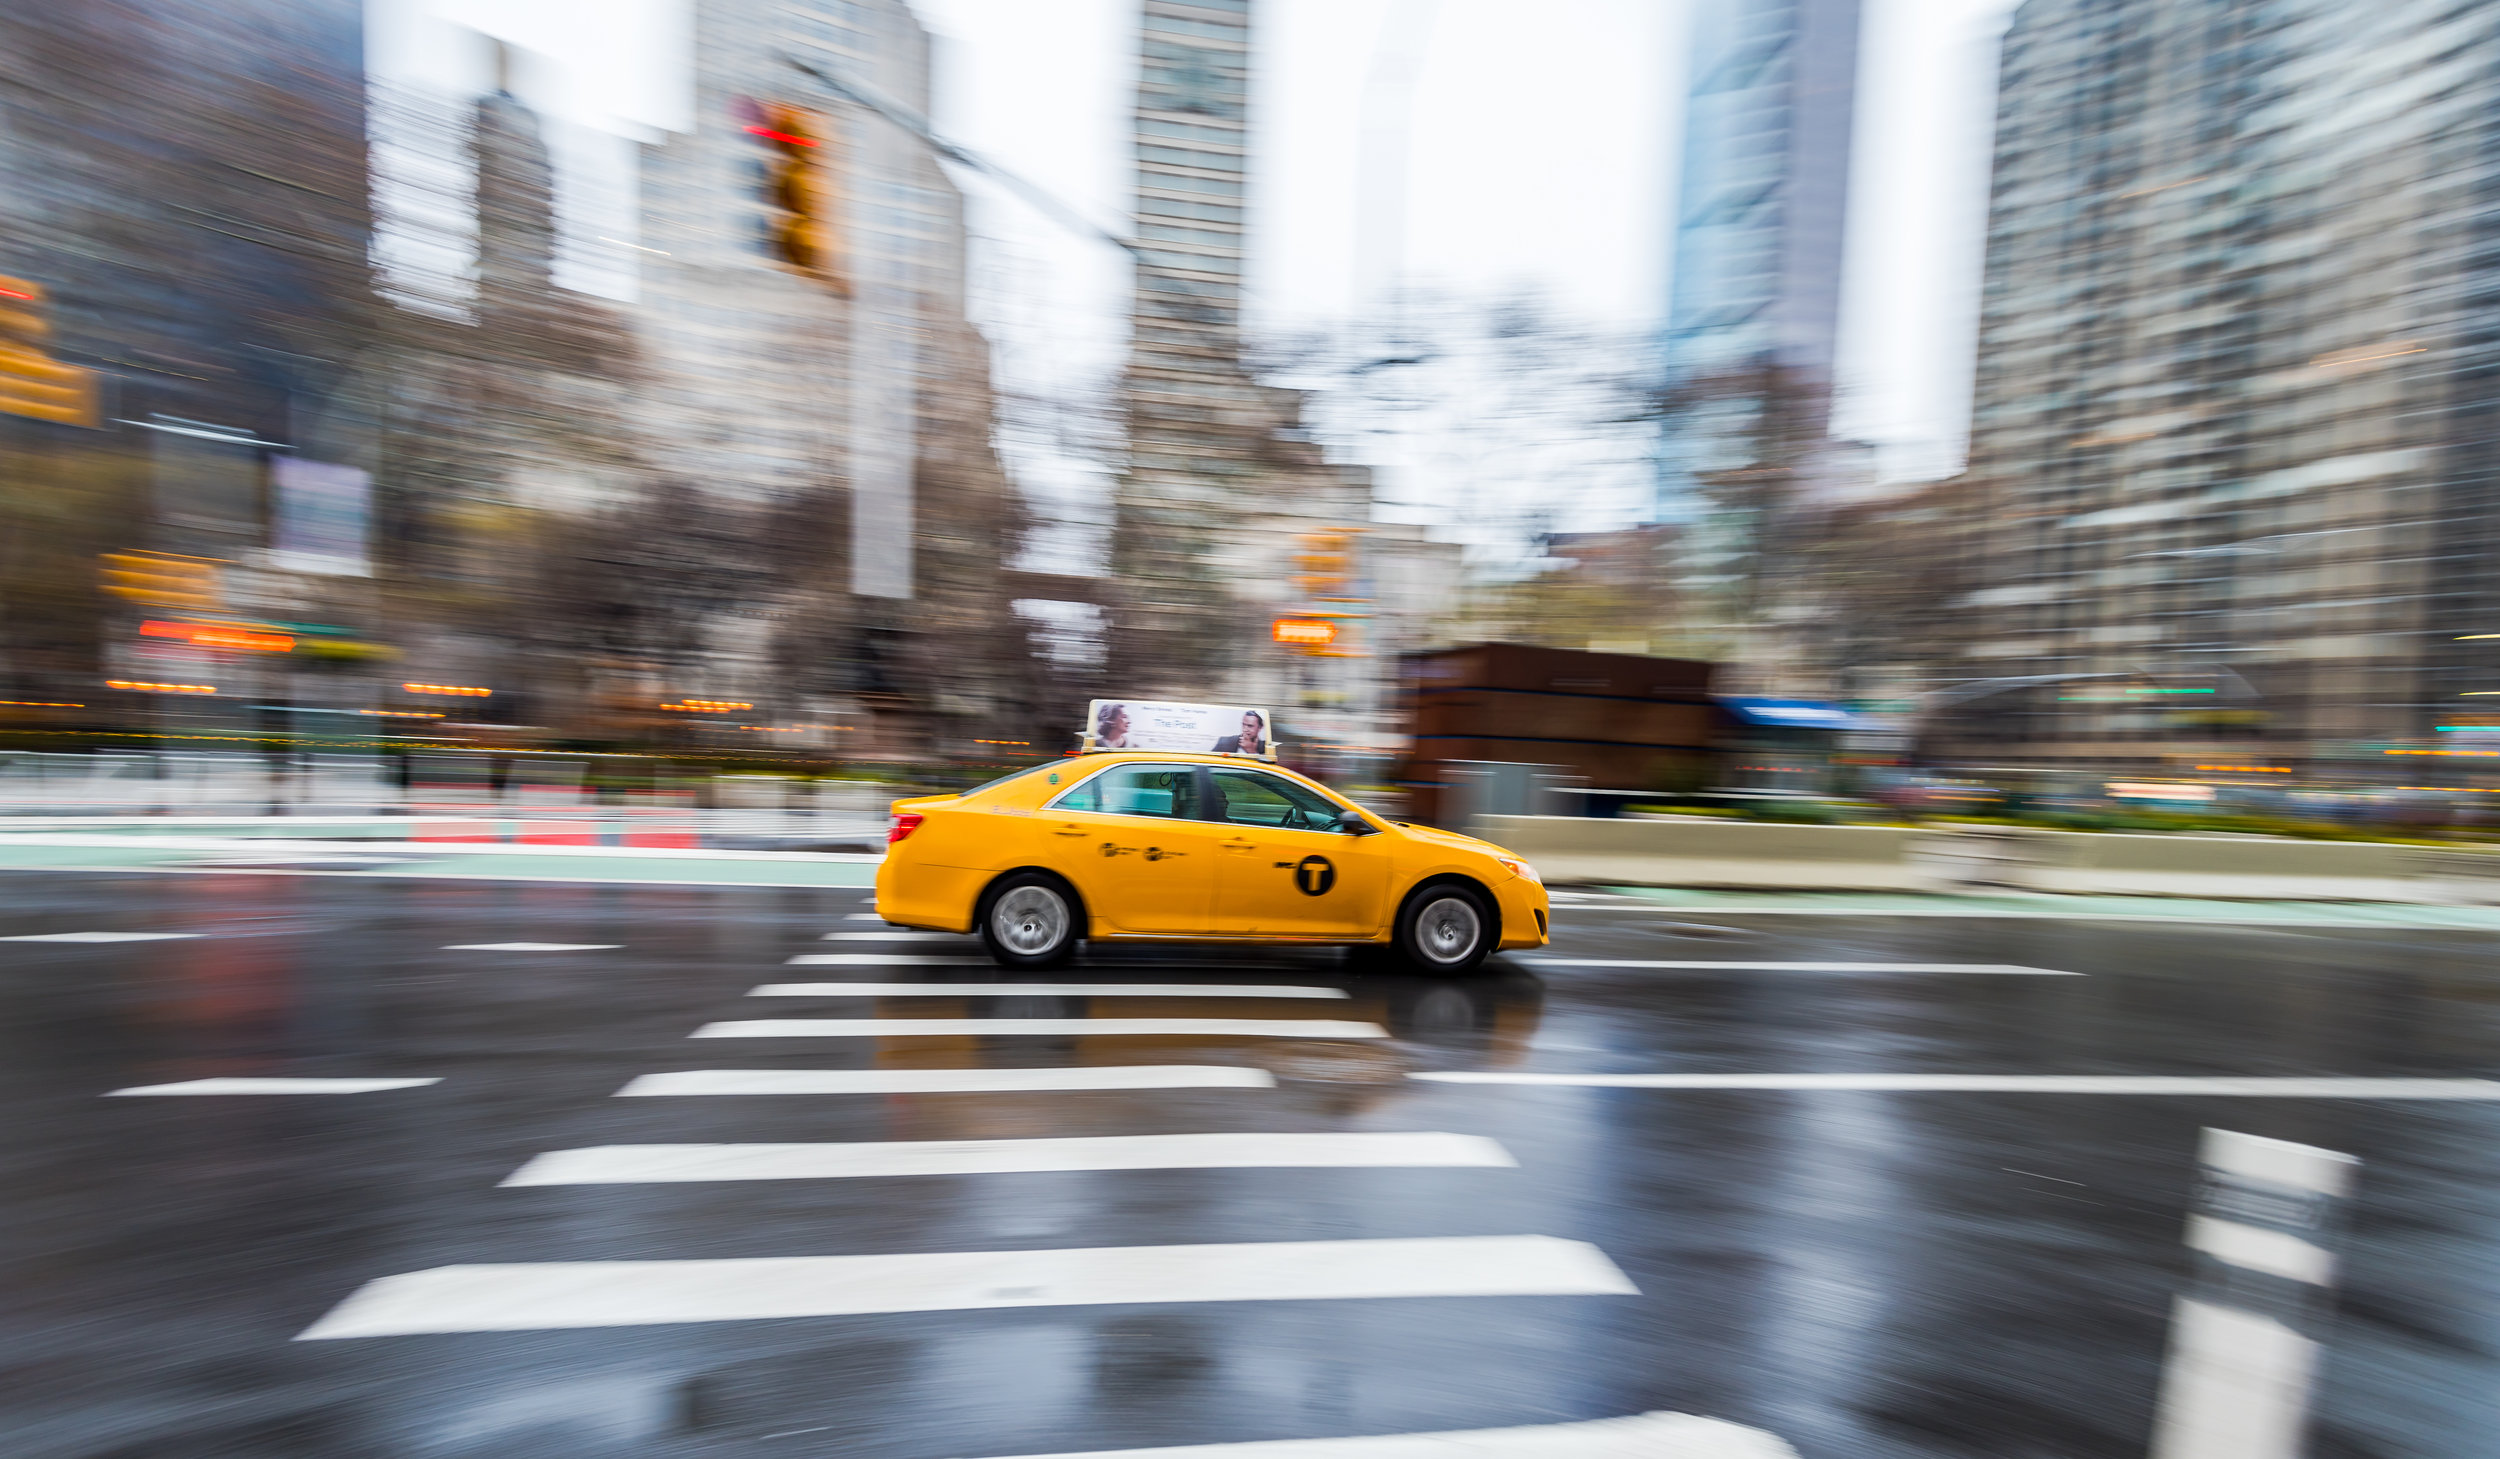
If you are new to this technique, do not expect to get a perfect shot in the beginning. You have to keep experimenting with different settings until you get the best result. Also using this technique, you might not get a super sharp result but panning allows you to shoot the moving subject smoothly and at the same time gives you the feeling of the motion. If you do it right, you will get the subject relatively sharper than the motion blur background, which is the main idea of this technique to give a sense of the moving subject. Here is something I tried during my recent visit to New York City.

New-York-Traffic.jpg

Exposure : 1/15 sec     Aperture : f/22     Focal Length : 16mm     ISO : 200

It's not as perfect as I would like it to be but I will try next time and keep practicing until I get the better result.

Nikon ML-L3 Wireless Remote Control

Remote shutter release method will come handy when you want to capture a fireworks, do night photography or any other kind of long exposure shooting where the movement of the camera will be the reason to get blurred image. If you want to trigger the camera shutter remotely, you have two options; one is to use a wired remote shutter release cord and the other one is to use a wireless remote control device. Few months ago, I wrote a blog about Nikon MC-DC2 wired remote shutter release cord and today I want to write about my experience with the wireless remote control device, Nikon ML-L3, to remotely control the shutter release. There are a lot of rumors and speculations about using the wireless remote control but I will express my opinion based on my own experience about the accessory and get your feedback as well.

Nikon ML-L3 Wireless Remote Control

Nikon ML-L3 Wireless Remote Control

In the past few weeks, I read some reviews about the ML-L3 where reviewers mentioned that it has to have a proper line of sight with the camera IR sensor to trigger the camera shutter remotely otherwise the device won’t work. If you are buying it without knowing this limitation of the IR technology, you might be disappointed with your decision. I think it is a limitation of using any system that works in a Infrared technology that the line of sight is a must for it to work. If the remote is completely out of sight with the camera, it might not work at all but in my experience, I have worked it out by trying from different angle pointing towards the camera. And the other feature that many people are concerned about is it's Autofocus feature. There is no doubt that this remote is able to autofocus the lens before triggering the shutter but it will not re-focus if the shutter release button has already been pressed halfway down to focus the subject. To focus using a wireless remote control, it would be better to compose your shot but do not press the camera's shutter release button half way down to focus it but instead, use the wireless remote control unit.

When you purchase the device, it might not come with the instruction to properly setup and connect the device with the camera. Here is a brief instruction on how to sync your wireless remote control with your DSLR camera.

How to use ML-L3 Wireless Remote Control?

Nikon D90 Top View

Nikon D90 Top View

To setup a wireless remote shutter with the camera, most of the Nikon DSLRs come with the menu option. If you go to the Custom Settings Menu (CSM) with the pencil icon, you will see the Release mode. This is where you can specify which method you want to use to release the shutter button. With the Nikon D90, its even easier than that. D90 and many other new DSLRs come with the release mode button just to the right side of the LCD panel. This button has a set timer icon and a wireless remote icon nearby. While pressing that button, you have to rotate the main command dial to change your release mode option. Nikon D90 gives you four different options when you rotate the command dial. You can choose for a single shot, continuous shooting, shoot in a timer mode or wireless remote mode. Once you change your release mode option to the wireless remote (it will display a wireless remote icon on the LCD), you are ready to use the wireless remote control to trigger the shutter remotely.

Nikon ML-L3 Wireless Remote Control supports Nikon P7000, D3000, D40, D40x, D50, D5000, D60, D70, D7000, D70s, D80 & D90 Digital SLR Cameras.

Nikon MC-DC2 Wired Remote Shutter Release Cord

Nikon MC-DC2 wired remote shutter release cord is primarily made for Nikon D90 and D5000 DSLR camera. MC-DC2 simulates the work of the shutter release button for the DSLR. When you press the shutter release button of your MC-DC2 halfway down, it will focus your subject (provided that your camera is in Autofocus mode) like it does when you press the shutter release button on the camera. It also has a lock feature to hold it down for a long exposure shooting while using the BULB mode. You will have more control over your camera using this cord vs Nikon ML-L3 Wireless Remote Control. MC-DC2 is 41" long and enough for you to move around your camera freely. When you want to shoot long exposure photographs like fireworks shooting or night scene, this cable works best to avoid any camera shake. MC-DC2 also works best when you want to shoot a macro. You can setup your camera on the tripod, check your cable connection and enjoy remote shooting. This unit is small, lightweight, and fits in your camera bag with ease. If you are looking for something to avoid camera shake while shooting, MC-DC2 can be your best friend.

How to use the remote shutter release cord?

Nikon MC-DC2

Nikon MC-DC2

Using MC-DC2 wired remote shutter release cord is really simple. When you want to use the shutter release cord, you just have to turn your camera off (if your camera is on) and then plug-in the cable to your camera port (single port on the left side on Nikon D90). Next step would be to turn on your camera and the shutter release cable is ready to use. You don't have to change or adjust any settings on your camera to make this cable work. As soon as you plug the cable in, it starts working as a remote shutter release button.

I bought this cord for Nikon D90 couple of months ago to shoot fireworks. I paid around $35 and it does exactly what it says it does. I am very happy with the purchase.