AF-S

How To Take Multiple Shots In A Self-Timer Mode?

This post is a part of our Q&A section. If you want to submit your question, please use the form in the Contact page.

QA.jpg

Shyam (Delhi, India) asked : I have set my camera settings to take multiple shots in a self timer mode, but when the pictures is taken, it takes only one shot. What am I doing wrong here?

Hi Shyam! First of all, I found your question little bit incomplete. You didn't mention what are the settings you have adjusted on the camera and under what lighting condition you are taking pictures. Sometimes, even if your camera settings are right, because of the available lights or not enough time to recycle the flash power or many other variables, you may not get the result you want. If you are shooting in a bright daylight, all you have to do is make sure that the camera is set to continuous (burst) shooting mode and the focus is being tracked and locked if the subject is moving. If you are shooting in a dark night and using an external flash unit, you might have to check couple of other settings as well, which I will describe bit later in this blog. First, lets review the setup steps that need to be done on the camera to take multiple shots in a self-timer mode.

Camera Settings for a Self-Timer Mode

In this blog, I am taking the reference of Nikon D90, but I believe these camera settings are same for almost every other Nikon DSLR camera. It is possible that you might find the buttons and the menu options in different places, but once you get the idea, it won’t be hard to adjust the settings no matter which camera brand and model you use.

Now, lets get into the setup menu.

1. Press the Menu button on the back of the camera and go to CSM (Custom Setting Menu).

2. Use the multi-selector button and go to c Timers/AE lock menu.

3. Go to the option c3 and select Self-timer, and you will see two options inside.

Nikon D90 Self-Timer Mode Menu

Nikon D90 Self-Timer Mode Menu

4. First option, Self-timer delay, allows you to set the time after how many seconds camera should start taking the pictures, and the available values are 2s, 5s, 10s, 20s.

4. And the next option is Number of shots you want to take in a self-timer mode. You can choose between 1 and 9 shots.

Nikon D90 Self-Timer Mode

Nikon D90 Self-Timer Mode

5. Optionally, you can also select CL (Continuous Low) mode shooting speed (1fps, 2fps, 3fps and 4fps) into CSM->Shooting/display->d6 (CL mode shooting speed).

D90 Burst Mode.png

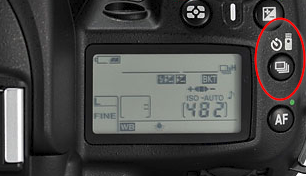
6. Finally, you have to change the shooting mode into self-timer mode (with burst shooting). You can do so my pressing the button on the top (shown in the picture) and rotating the main command dial while the button is still being pressed. When you see the burst mode with the clock (self-timer) icon displayed on the LCD screen, you can let go the button and you are all set.

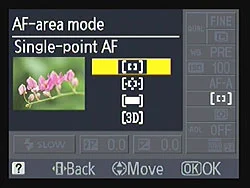
If you have already done all of these setup on the camera and still not getting multiple shots in a self-timer mode, it is time to check your camera's Autofocus Mode. When you are shooting in a burst mode, you probably want to use AF-C or AF-A autofocus mode. And if you are shooting in a dark night with an external flash on, you may not get multiple shots because of the flash recycle time. Once you take a shot, flash may take a few seconds to recycle itself and get ready for the next shot. Also, if you are shooting with a higher frame rate, 4fps for example, its hard to achieve that shooting speed with an external flash unit attached on the camera.

I hope I was able to answer your question, and if you have a follow up question or more questions, please write back to me. Happy shooting!

Understanding An Autofocus Mode In Modern DSLR Camera

Autofocus is one of the great features available in modern DSLR camera. Some cameras are equipped with an Autofocus motor inside the camera and some are not. Similarly, there are lenses which come with the built-in Autofocus motor inside itself. Benefits of having an Autofocus motor inside the camera is that it can Autofocus the lens which doesn't have a built-in Autofocus motor. Nikon D40, D40X, D60, D3000 and D5000 models lack an Autofocus motor. But Nikon D90 does have an Autofocus motor built-in inside so that it can fully Autofocus the lenses which lack an Autofocus motor. There are two ways for the DSLR camera to focus the subject; manually and automatically. When your lens is setup to focus automatically (by using the switch available on the lens), camera offers few different ways to achieve that autofocus.

Different camera brands provide different kind of Autofocus mode and sometimes only the naming is different but the core functionalities are same. Most of the Nikon DSLRs including D90 come with the three different Autofocus modes and one Manual mode. To change between different Autofocus mode in D90, you have to press the AF button on the top of the camera near the monochrome LCD screen and rotate the main command dial. While changing the modes, you can see currently selected Autofocus mode on your top LCD screen as well. Most of the high end semi-pro or pro DSLRs come with the dedicated lever to switch/lever between different autofocus modes. Now, let's discuss about these different autofocus modes and when should we use them.

D700 Autofocus switch

D700 Autofocus switch

1. AF-S (Autofocus Single)

In this mode, focus is set once when you press the shutter release button halfway down and the camera keeps the focus locked on the subject until the shutter button is fully pressed to take a picture. If you release the shutter button without taking a picture, you will have to re-focus again to take the picture. This mode will be your best choice if you are shooting subjects that do not move such as landscapes, cityscapes or portraits etc. In this mode, by default, you might not be able to take a picture until the focus is locked on the subject.

2. AF-C (Autofocus Continuous)

This mode is good if you are shooting moving subjects like in wildlife and sports photography. When the camera is set to AF-C mode, once the shutter release button is pressed halfway down, the camera sets the focus on the subject but continues to monitor the subject in order to re-focus if it's moved from the original position. While shooting using AF-C mode, focus and exposure aren't really locked until you press shutter release button all the way down to take a picture. In this mode, by default, you can take a picture even if camera has not fully focused the subject but you end up getting blurry images.

3. AF-A (Autofocus Automatic)

This mode is actually a combination of the two modes described above. When your camera is set to AF-A mode, camera focuses subject using AF-S mode if the subject is not moving but it changes automatically to AF-C mode if subject starts moving. Isn't that pretty cool? This mode is pretty good when you are shooting mixture of the actions. This mode is probably the default mode in your camera. However, like in AF-S mode, subject needs to be sharply focused to release the shutter release button all the way down and then only camera takes the picture.

4. Manual Focus

You can use the manual focus mode when your lens is set to the manual focusing mode (using the switch on the lens itself) or if your lens is not equipped with an Autofocus motor. In this mode, you can manually focus your subject using the focusing ring on the lens barrel. Manual focus is popular among the landscape photographers specially when they want to achieve sharp focus from the foreground to the background (some prefer to focus into infinity and some prefers to focus into one third of the frame to achieve everything in focus).

Some photographers like to shoot in a manual focusing mode all the time but I prefer to use Autofocus mode most of the time except in some tricky landscape shot where I also use manual focus.