Commander Mode

How To Setup Nikon SB-800 As a "Master Flash Unit"

If you want to control other flash units remotely using a SB-800, you have to set it up as a master flash unit. And here are the few steps to configure a SB-800 flash unit as a Master Flash Unit.

SB-800-1.jpg

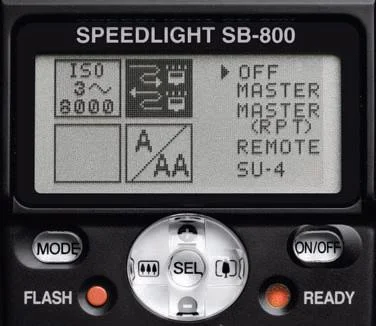
1. With the SB-800 unit turned on, press and hold the SEL button for two seconds and the display will be changed.

2. Locate the shaded box and use the toggle buttons to highlight the wireless symbol.

3. Press the SEL button for one second. By doing so, the one right arrow pointing towards the OFF will change to two arrows (up and down) and the OFF selection on the right will be shaded.

SB-800-2.jpg

4. Scroll down and select the MASTER by highlighting it and pressing the SEL button for two seconds. The display will then change to the Master view.

5. Press the SEL button to highlight "M". By pressing "+/–" you can change the flash output compensation value for the "M" group. Pressing the MODE while a group (M, A, B or C) is highlighted will change how the Speedlights in that group will react.

Available Flash Modes: TTL - Through The Lens metering A - Auto Aperture M - Manual - - No light output (although in M - - a preflash will occur)

SB-800-3.jpg

Press the SEL button to jump from group M to A to B to C. Set the amount of flash output compensation for each group using "+/–" as you go.

6. Use the SEL button to highlight “CH” and use "+/–" to select the channel you will be working in. There are 4 channels which allow multiple photographers using the Nikon Creative Lighting System to control only their own Speedlights.

Note: The channel you choose for the Master Speedlight must be the same channel the remote units are set to.

7. Attach the Master Speedlight to your camera and you are ready to control other speedlights remotely.

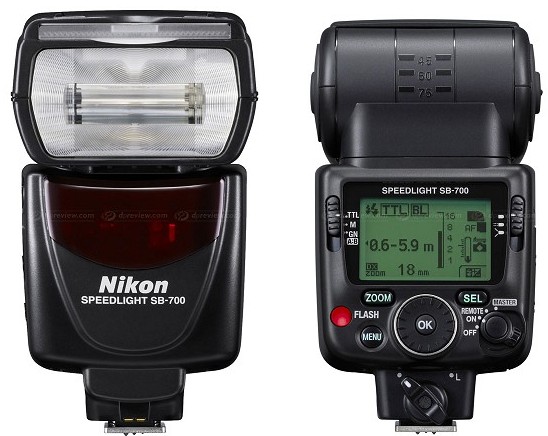
If you are looking for how to configure a SB-900 and a SB-600 flash units in a wireless mode, here are the links for How to setup the SB-900 as a Master Speedlight Unit and How to setup SB600 flash to work in Commander Mode.

Source: A Hands-on Guide to Creative Lighting by Nikon School

How To Setup Nikon SB-900 As a "Master Speedlight Unit"

You can configure a Nikon SB-900 speedlight unit in a Master or a Commander mode by using the Power ON-OFF switch, also known as wireless setting switch. Here are the few steps you can follow to configure a SB-900 flash to work as a master unit.

sb-900-power-on.jpg

1. Turn the switch while holding down the button in the center.

2. Align the index on the Power ON-OFF switch to MASTER.

This is all you need to do to make a SB-900 work as a master unit.

Now, let’s talk about setting the flash mode, flash output level compensation values and the channel number on the master flash unit.

1. Press the Function button 1 on the Master flash unit to highlight “M”.

Note: Left most button on the second picture (left to the lock sign) is Function Button 1 and right button to the lock sign is Function Button 2.

2. Press the MODE button, then turn the selector dial to choose the desired flash mode, and then press the OK button.

3. Press the Function button 2, then turn the selector dial to choose the desired flash output level compensation value, and then press the OK button.

Available Flash Modes: TTL Through The Lens metering; A Auto Aperture; M Manual; - - No light output (although in M - - a preflash will occur)

Available Flash Modes: TTL Through The Lens metering; A Auto Aperture; M Manual; - - No light output (although in M - - a preflash will occur)

4. Press the Function button 1 to highlight the Group ”A”. Group A is selected by default but if you want to select a different group than A, turn the selector dial to choose a different group name.

5. Repeat the procedures in step 2 and 3 to set the flash mode and the flash output level compensation values for the remote flash units in Group ”A”.

6. You can repeat the entire process to set the flash mode and the flash output level compensation values for the remote flash units in Group ”B” and ”C” as well.

Note: After setting the output compensation value, press OK twice to reveal the ”Ch” above Function button 2.

7. Press the Function button 2, then turn the selector dial to set the channel number, and press the OK button.

Note: The channel you choose for the Master Speedlight must be the same channel the remote units are set to.

8. Attach the Master Speedlight to your camera and you are ready to control other flash units using SB-900.

If you are looking for how to configure a Nikon SB-800 and a Nikon SB-600 flash units in a wireless mode, here are the links for How to configure SB-800 flash unit as a Master flash unit and How to set SB600 flash to work in a Commander Mode.

Source: A Hands-on Guide to Creative Lighting by Nikon School

Nikon Flash And The Commander Mode

Nikon Commander Mode allows you to control the remote flash unit(s) from your camera wirelessly. If you use an external flash, this blog might be helpful to understand what is the commander mode, what is it used for and how does it work on your DSLR camera? Commander mode is one of the very powerful feature available in most of the advance Nikon DSLR cameras including Nikon D80, D90, D200, D7000, D700 and D300 that allows your camera's built-in flash to control the remote (off camera) flash by sending an infrared signal over the wireless media. Most of the today's flash unit like SB-600, SB-800, SB-900 and SB-R200 support commander mode except SB-400. Nikon SB-400 is not considered as an Advance Wireless Lighting strobe. It can only be used in the hot-shoe or with a sync cord connected to the hot-shoe. Let’s discuss few possible scenarios in which you can use SB-900, SB-800, SB-600 and SB-R200 speedlights.

SB600.jpg

Nikon’s SB-800 or SB-900 unit can also be used as a master unit (like the camera’s built-in flash in a commander mode) to control other flash units like SB-R200, SB-600 or even other SB-800 and SB-900 units wirelessly. But SB-R200 and SB-600 can't trigger other units and can only work in a slave mode (to be triggered by either camera’s built-in flash in a commander mode or other master unit like SB-800 or SB-900). So, based on their capabilities to act as a master unit or slave unit, we can use them in three different scenarios.

First scenario - If you have Nikon SB-900 or SB-800 flash unit, you can place it on the camera hot shoe and set it in "Master Mode" to trigger other master or slave units wirelessly.

Second scenario - If you have SU-800 Wireless Commander Unit, you can place it on the camera hot shoe and control any external flash unit (in slave mode) wirelessly.

Third scenario - And if you do not have SB-900 or SB-800 or SU-800 but only have slave flash units, SB-600 for example, you can trigger them using the built-in flash of your camera by configuring it in commander mode and that is what we are going to discuss in our next section.

Let’s go through the camera settings for Nikon DSLRs to set up a built-in flash unit into commander mode so that we can control the external flash units using camera's built-in flash.

How to set the commander mode in Nikon DSLR?

In this setup, I am taking Nikon D90 as an example but you can use this setup for any other Nikon DSLR that supports built-in flash to be in commander mode. Let's go right into the setup now.

1. Press the Menu button on the back of your camera.

2. Go to Custom Setting Menu option (pencil icon).

3. Select e, Bracketing/flash, menu and press OK.

4. Select e2, Flash cntrl for built-in flash, and press OK.

5. Choose the Commander Mode.

commandermode.jpg

When you are inside the Commander mode, you can set different parameters to control the remote flash unit. You just have to be careful about which Group and Channel you select because you are going to use the same Group and the Channel settings in your remote flash units as well. Group is set to combine the multiple flash units in a single or different groups for the exposure settings and the Channel is used to avoid any interference with other camera's settings around you (used by different photographers if there are any).

Now, let's discuss about the different options your camera’s built-in flash unit can be set to.

  1. TTL - Through The Lens. If you select this option for the built-in flash, it will fire the pre-flash first, collect the exposure information from your subject Through The Lens (TTL) and send that information to the external flash unit(s). Then, your built-in flash also fires the main flash along with other external flash units to illuminate the subject.

  2. AA - Auto Aperture Mode. This is an older implementation of the TTL system and not used much these days.

  3. M – Manual Mode. This mode allows you to set the flash power manually rather than auto adjusted based on TTL information your camera gives.

  4. - - If you set the built-in flash into - - mode, your built-in flash will fire the pre-flash first, collect the exposure information from the subject and send that information to the external flash units so that the external units can set the flash power to illuminate the subject properly. In this setup, built-in flash doesn't fire the main flash to control the exposure but only send the exposure information to the external units. But if your subject is too close to the camera, pre-flash from the built-in flash might have some influence on the overall exposure of the image.

Important - After finish setting up your camera's built-in flash into the commander mode and an external flash unit to receive the signal, please do not forget to pop-up your camera's built-in flash. When you are ready to trigger an external flash units, it is important to pop-up built-in flash of your camera because this is how your camera sends the signal and the exposure data to an external flash units. It works great with my Nikon D90 and D700 using a SB-600 as an external unit and controlling it using camera's built-in flash. If you are having any problem working with this settings, please let me know and I will be happy to help you in any way possible.