In my previous blog posts I discussed about How to configure SB-600 as a Wireless Remote Unit, How to configure SB-800 as a Master Flash Unit and How to configure SB-900 as a Master Flash Unit. Today, we are going to discuss about how to setup a SB-800 as a wireless remote unit or also called a slave unit. These are very easy and simple steps to configure a Nikon SB-800 unit as a remote flash unit. Let's jump right into it.

1. With the flash unit turned on, press and hold the SEL button for two seconds.
2. Locate the shaded box and use the toggle to highlight the wireless symbol.
3. Press the SEL button for one second and the top single arrow will be changed to up and down arrows.
4. Scroll down and select the REMOTE by highlighting it and pressing the SEL button for two seconds. The display will then change to the Remote view.
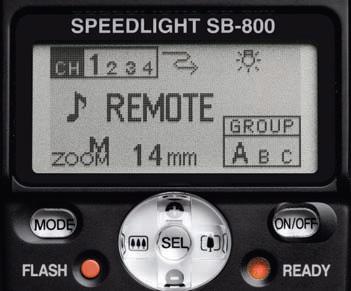
5. Press the SEL button to highlight "CH", use "+/–" to select the channel. The Remote and the Master units must be set to the same channel or else they will not communicate with each other.
6. Press the SEL button again to highlight the group. Use "+/–" to choose Group A, B or C.
Note: Please be sure to choose the same channel number as set on the Master flash unit or in the Commander mode in your camera.
The amount of the output compensation set for Groups A, B and C on the Master Flash will determine the amount of the output from the Remote Speedlights. Once you are done with the setup, the SB-800 is ready to receive the signal from the master flash unit and fire the flash.
Source: A Hands-on Guide to Creative Lighting by Nikon School