Release mode allows you to choose how you want to release the shutter of your camera. D7000 lets you choose from Single frame, Continuous mode, Self-timer mode, Remote control mode, Quiet mode and the vibration-damping Mirror Up mode. D7000 also comes with the release mode dial lock which prevents from changing modes accidentally. When you want to change the release mode, all you have to do is press the release mode dial lock release button on the left side of release mode dial (at the top-left edge of the camera) and rotate the release mode where you want to set to. Let’s get into the release modes that are available in Nikon D7000 and talk about them briefly.
Read MoreCamera Controls and Se...
Trying Multiple Exposure Is A Fun Shooting
Multiple exposure feature lets you combine two or more exposures into one image without using any post processing tool. This option is only available in P, S, A and M exposure mode. Sometimes it’s good to play with camera settings and do an experimental shooting. And, if you are planning for something fun, trying a multiple exposure is a good option. Nikon offers a feature called "Multiple Exposure" which combines two or more images using the RAW data from the sensor, producing images that are blended together smoothly. Here is a step by step camera setup guide if you are interested to try this on your camera.
Camera settings for Multiple Exposure

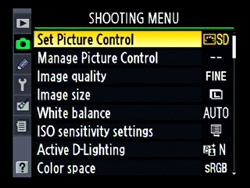
Multiple Exposure Menu on Nikon D90
1. Go to the Shooting menu by pressing the Menu button on the back of your camera.
2. Choose “Multiple Exposure” from the Shooting menu.
3. Select the “Number of shots” you want to combine into a single frame. Nikon D90 allows you to select up to 3 shots.

4. Choose Auto Gain and select either ON or OFF. When ON is selected, Nikon D90 will divide the total exposure of the image by number of shots specified. For example if you specified number of shots 2 and Gain is ON, each shot will get ½ of the total exposure. If Gain is OFF, total exposure is applied to an individual shot.
5. Press OK to set the Gain.
6. After you are done with the setting, scroll up to the Done and hit OK. Upon completion, you will see the Multiple Exposure icon (overlapping rectangle) on the LCD screen and you are ready for the shot.
7. When you take the first shot, Multiple Exposure icon on the LCD screen starts blinking until you finished shooting all the series (no of shots you specified). If you are in a continuous shooting mode, all the series will be shot in a single burst shot. When you have taken all the series, blinking icon disappears and camera will turn off the Multiple Exposure feature automatically.
Here are the couple of shots I took today as an experiment. I set the number of shots 2 and shot couple of pictures with the Gain OFF and again took another set with the Gain ON. I took all of the pictures with the same exposure settings and didn’t use a tripod, which is why you can see a little overlapping between two frames when they were combined to a single shot. When you take two shots, camera will process itself and combine them into a single shot giving you the Multiple Exposure effects in a single image. I have seen people being experimental and create ghost effects using this technique.
Gain ON

Multiple Exposure Gain On
Focal length : 24mm Exposure : f/3.8 Shutter Speed : 1/60sec ISO : 800
Gain OFF
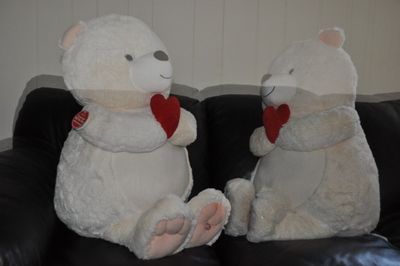
Multiple Exposure Gain Off
Focal length : 22mm Exposure : f/3.8 Shutter Speed : 1/60sec ISO : 800
In both situations, I used only one teddy bear to get the final image. What I did is, first I put the teddy bear on the left side and took a shot. Then, I put the same teddy bear on the right side and adjust a frame, so that both can fit into a single frame after camera combines two images into one, and took the second shot. After camera combined both shots, this is the result I got. It's not a perfect shot and also because of the handheld shooting, pictures didn’t get align properly. But, you can create amazing effects using this technique if applied properly. Nice thing about this feature is that you don't have to use any software to get the effect, your camera will do it for you automatically.
How To Set Custom White Balance
White balance is the tool to help get the colors in your images as accurate as possible. White balance setting is based on the color temperature and those color temperatures are measured in a Kelvin scale. Higher the temperature, more blue light exists and lower the temperature, more red light exists. You can take an example of fire; lower temperature fire produces red flame whereas higher temperature fire produces blue flame. As a photographer it is important to know that any light below 4000k starts to appear as a red light and any light above 7000k starts appearing bluish. In photography, the warmer light means red or yellow and the cooler light means blue light. You have to judge the environment and the lighting condition of the shooting spot and adjust the white balance accordingly to get the nice and pleasant color effects to the photographs.
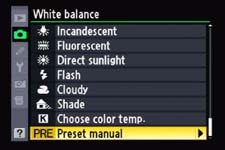
White Balance Menu on Nikon D90
Nikon DSLRs come with the pretty standard predefined White Balance settings like Auto, Incandescent, Fluorescent, Direct Sunlight, Flash, Cloudy, Shade, Color temp and preset manual. Auto White Balance (AWB) works pretty well most of the time, but sometimes, you need to change the WB settings to get more accurate color representation on the picture. White balance can also be used to do an experiment with the color effects on the photograph and change the mood of the picture. Its an easy process to change the white balance option to one of the predefined settings. You just have to navigate through the white balance option from the menu button on the back of the camera (button location depends on your camera model) and select whatever value you want to set. If you are shooting under tungsten light bulb, you may want to change the white balance to Incandescent and if you are shooting outside, you may want to choose the direct sunlight and so on.
If you want to set the custom White Balance rather than what is already provided with your camera, you have an option, called Preset Manual, in Nikon DSLR cameras. If you scroll all the way down to the white balance setting, you will see the last option as a preset manual denoted by 'PRE'. If you have not setup custom white balance using the preset manual before, you will see bunch of blank memory slots denoted by d-0, d-1, and d-2 and so on. These are the camera's memory slot to store the data from which it reads the white balance data if you choose to select the preset manual White Balance instead of other predefined values which we discussed earlier. Now, let’s discuss how to set the custom white balance.
How to set the Custom White balance using Preset Manual?
1. Set your camera into P, S, A or M mode.
2. Press and hold the WB (White Balance) button and rotate the rear command dial to select 'PRE' in the control panel and then release the WB button. When the white balance is in 'PRE' mode, you can use the front command dial to change the memory slot from d-0 to d-1, d-2 and others if available.
3. Press and hold the WB button for a few seconds again and you will see 'PRE' starts blinking on the top LCD screen.
4. While 'PRE' is blinking, take a shot of white or grey index card (Note: 'PRE' blinks about 10 seconds and you have to take the picture while it is blinking).
5. If the camera was successful to get the white balance data from the picture, it will display 'Good' on the LCD screen, and if not, it will display 'no Gd' and you have to try again with the proper exposure.
6. After you complete the process and set your custom white balance, your camera will take the reference of that image while applying the white balance to the future shots unless you have set the white balance to some other settings than PRE.