Camera Controls and Se...

Nikon D90 Autofocus Area Mode

In my previous blog post, we discussed about different Autofocus Modes available in Nikon D90 and learned how to use them in different situations depending on what kind of subject we are shooting. In this blog, we are going to discuss about “Autofocus Area” which allows us to choose which of the 11 focus points should be used to evaluate and lock the focus. By default, Nikon D90 selects the focus area among available AF points itself, which works perfect most of the time. But if you want to select the focus point yourself, you have to change the default settings on the camera and that is what we are going to discuss next.

Nikon-D90-AF-area-mode.jpg

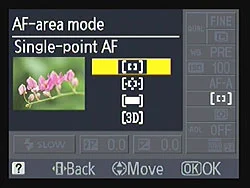
If you press the menu button on the back of the camera and go to the CSM (Custom Settings Menu) menu which looks like pencil icon, the first option you will see is AF-area mode and this is where we will need to change the focus area setting. When you are in the menu, press the AF-area mode and you will be presented with the four options to set the autofocus area mode. Let me explain these different modes in brief so that you can decide which mode to use in your shooting environment.

1. Single point

When this mode is selected, you can choose which one of the 11 focus points should be used to focus the subject and the camera sticks with that focus point. This mode works best for the stationary subjects but will also be helpful when you want to focus on particular one subject among many. One of our readers asked a question: "how to force her D90 to autofocus particular subject" while shooting in a jungle and the Single Point focus mode was the best option for her. Nikon D90 automatically uses this option in a Close-up scene mode. In this mode, you have to select the focus point manually by using the multi-selector button (thump pad) on the back of the camera.

2. Dynamic area

When you select this mode, you can select the focus point but the D90 can use other focus points as well if the subject moves. This mode is the best option for capturing moving subjects.

3. Auto-area

This is default mode for Nikon D90 where camera selects the focus point for you automatically. I use this mode most of the time and works great.

4. 3D-tracking (11 points)

In this mode, you select the focus point using the multi-selector button but if your subject moves, D90 tracks subject in 3D direction and re-frame it as it moves right, left, up, down, forward and back. This mode is the best option for sports photography.

How To Setup Automatic Exposure Bracketing (AEB)

I wrote a blog about the exposure compensation and bracketing last month where I talked about the exposure compensation, when to use it and what does the bracketing mean? In this blog, I am going to talk about the Automatic Exposure Bracketing (AEB) and how to set the controls to activate the exposure bracketing feature for the Nikon D90 or any other DSLR in that matter although the menu settings and the controls might be in different places for a different camera. Sometimes, manually bracketing and taking multiple shots will be forgetful and tedious job. And that is the main reason we use Automatic Exposure Bracketing (AEB) feature available in most of the advance DSLRs. When AEB is activated, camera will take three (or more depending on the camera model and the settings applied) shots automatically provided that you are in a continuous shooting mode or a burst shooting mode. Once the automatic bracketing is activated, when you press the shutter release button once, it takes the first picture at the camera measured exposure, second picture with a negative exposure compensation (usually -1/3 EV but Nikon D90 allows you to specify a different value), and the third with a positive exposure compensation (usually +1/3 EV).

How to set Nikon D90 for AEB?

Nikon D90 Bracketing Menu

Nikon D90 Bracketing Menu

1. Press the Menu button on the left side of your camera.

2. Navigate to the Custom Settings Menu (Pencil icon).

3. Go to e bracketing/flash menu and option e4 is for setting up Auto Bracketing with different options.

4. Inside auto bracketing, you have other options available as well to set for but Automatic Exposure (AE) is what we are discussing here.

D90 Bracketing Order.png

You can also set the order of how you would want your camera to take the pictures whether it is in the order of correct exposure first, under exposure second and over exposure at last or under exposure first, correct exposure second and over exposure is at third. In order to set that order, you have to go to e6 Bracketing order menu under e bracketing/flash menu and set whichever order you want. This doesn't make any difference on the exposure but just the order in which photographs will be taken and saved in the memory.

Nikon D90 Bracketing Button

Nikon D90 Bracketing Button

Now the next step is to set the exposure value and the number of frames you would want. Nikon D90 allows you to shoot 2 frames over exposed and one correctly exposed (+2F) or 2 frame under exposed and one correctly exposed (-2F) or traditional 3F which gives one under exposed, one correctly exposed and one over exposed picture. So the maximum number of frames for Nikon D90 is 3. In order to setup +2F, -2F or 3F, press the BKT button on the left side of the camera, just below the flash button, and once the button is pressed, you will see an option displayed on the top LCD near the shutter release button to set the exposure value and the number of frames. While pressing the bracketing button, rotate the main command dial to change the number of frames whether it is +2F, -2F or 3F and use the sub command dial to change how much you want to shift the exposure value for the under and the over exposed photographs. Once you are done with all those setup, your camera is ready to take the bracketed shots.

Automatic Exposure Bracketing is a great feature if you want to blend multiple exposure shots and extract the details and the shadows by creating an HDR (High Dynamic Range) image. This technique is getting increasingly popular in landscape photography and I use it almost every time when I shoot night cityscapes .

Movie Settings Menu In Nikon D90

Nikon D90 is the world's first DSLR camera to record HDTV movie with sound. It gives you three different options of recording movies and today we are going to discuss the movie settings menu available in Nikon D90. When you press the menu button on the back of your camera, you will be given different choices of menu settings for your camera. But right now we are interested in a movie settings option and for that, lets go to the Shooting Menu option (camera Icon) and scroll all the way down to the Movie settings menu and click OK. Actually there are not much settings to be done to record a movie with D90 but you can adjust movie quality (frame size) using this menu option and enable or disable the sound recording option. Nikon D90 shoots all the movie clips at the same rate, 24 frames per second. Here are the few options you can set under this menu.

  • 1. Quality

  • 2. Sound (press OK to enable or disable sound recording option)

When you select Quality and enter OK, you will be presented with three framing size options.

Nikon D90 movie settings menu

Nikon D90 movie settings menu

1280x720 (16:9): This option will let you shoot in HDTV quality movies in the 16:9 aspect ratio. As this mode allows High Quality movie, it consumes more space in your memory card. Main disadvantage of this mode is, it allows you to shoot only 5 min of HDTV movie. But this framing size is best viewed on big screen TV.

640x424 (3:2) : This is the default option set to Nikon D90. This mode allows you to record non-HDTV video as of normal non-HDTV camcorders and best viewed on small size monitor. This setting allows you to record 20 minutes of video. Personally I use this setting to record video with my Nikon D90.

320x216 (3:2): This mode is used to produce compact framing movies and allows you to record 20 minutes long video.

After you set the framing size, click Live view (Lv) button on the back of your camera and press OK to start recording video and press OK again to stop the recording. Nikon made it very easy and simple enough to a record video with Nikon D90.