Q & A

What Is Depth Of Field (DoF)?

This post is a part of our Q&A section. If you want to submit your question, please use the form in the Contact page.

QA.jpg

Manjit Singh (Delhi, India) asked : Can you please explain me about Depth of Field and it’s relation to the camera settings?

This is what Wikipedia says about DoF - In photography, depth of field (DoF) is the distance between the nearest and the farthest objects in a scene that appear acceptably sharp in an image. Although a lens can precisely focus at only one distance at a time, the decrease in sharpness is gradual on each side of the focused distance, so that within the DoF, the unsharpness is imperceptible under normal viewing conditions.

Sometimes you want to focus everything inside the frame (for example you are doing landscape photography), and a large DoF is appropriate. And in other cases where you are doing macro photography or portrait photography and want to blur the background, a small DoF may be more effective, emphasizing the subject while de-emphasizing the foreground and the background. Usually, a large DoF is often called deep focus or deep depth of field, and a small DoF is often called shallow focus or shallow depth of field. Now let’s discuss briefly about these terms.

Shallow depth of field: When you selectively focus one part of the image and let rest of the image go out of focus, you will get shallow depth of field. This is pretty famous when you are shooting macro or portrait and want to blur the background or produce nice bokeh in the background.

Shallow depth of field

Shallow depth of field

Focal length : 28mm     Aperture : F/4.5     Shutter speed : 1/40 sec     ISO : 200

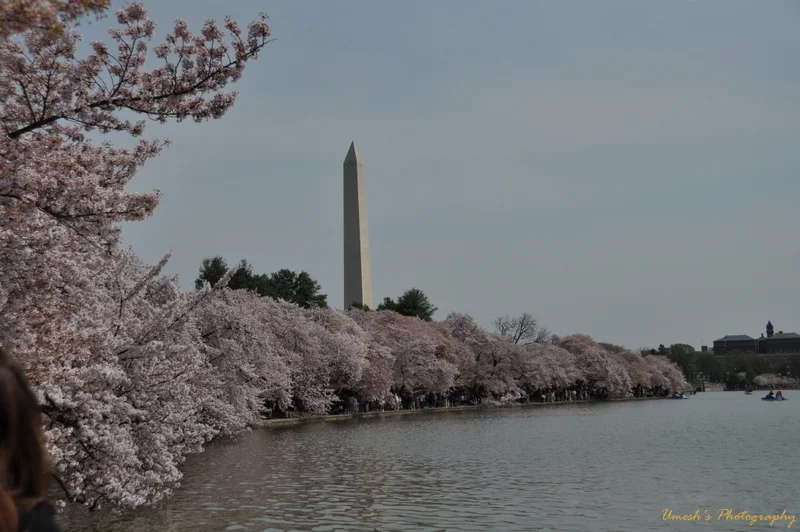
Deep depth of field: When you want to keep everything inside the frame from the foreground to background in focus using correct combination of camera settings, it is called deep depth of field or larger depth of field.

Deep depth of field

Deep depth of field

Focal length : 32mm     Aperture : F/8     Shutter speed : 8 sec     ISO : 200

Now let’s take a look at the camera settings that affect depth of field. The DoF is determined by an Aperture, lens Focal length and the physical distance from the subject.

1. DOF and its relation to an Aperture

To get shallow depth of field, you need large opening of the Aperture. And please keep in mind that large opening of Aperture means small f-stop value. Smaller the f-stop value, larger the lens aperture opening will be (allows more light and faster shutter speed) and larger the f-stop value, smaller the lens aperture will be (allows less light and slower shutter speed).

In another word, we can say: for a given subject magnification, increasing the f-number (decreasing the aperture diameter) increases the DoF; decreasing the f-number decreases DoF.

If we keep the focal length and the distance from the subject fixed: larger the opening of Aperture (small f-stop value), shallower the depth of field you will get and smaller the opening of Aperture (large f-stop value), deeper the depth of field you will get.

2. DoF and its relation to the Focal length

Focal length is something that depends on type of the lens you are using. If you are using zoom lens, you can zoom in and zoom out to increase and decrease lens focal length.

If we keep an Aperture and the Distance from the subject fixed: larger focal length will give you shallower depth of field and smaller focal length will give you deeper depth of field.

3. DoF and its relation to the Distance

Physical distance from the subject to the camera also affects depth of field.

If we keep an Aperture and the focal length fixed: closer you are to the subject, shallower your depth of field will be and farther you are from subject, deeper your depth of field will be.

Conclusion: Larger aperture opening (small f-stop value), closer to the subject and larger focal length will give you the shallowest depth of field possible.

What Is Flash Shutter Speed?

This post is a part of our Q&A section. If you want to submit your question, please use the form in the Contact page.

QA.jpg

Dinesh (Mumbai, India) asked : I read your post about flash sync speed and got confused about flash sync speed and flash shutter speed. I went through Nikon D90 manual but couldn’t be satisfied with the explanation they gave. Can you please tell me the difference between flash sync speed and flash shutter speed?

If you already read my post about flash sync speed as you have mentioned in your question, I will skip that part and jump right into your question about what is flash shutter speed and when should we use it?

Flash shutter speed represents the minimum (slowest) shutter speed your camera will use when the flash is set to normal sync mode. Sometimes it’s also referred as a “studio sync” speed. Many photographers especially studio photographers have used sync speed of 1/60th of sec which has become somewhat standard. However, some photographers like to shoot in a different shutter speed. If you would like to eliminate as much ambient light as possible, you should go with the higher value such as 1/200th of sec or 1/250th of sec shutter speed. But if you want to capture ambient light (using rear curtain slow sync), you can start with 1/60th of sec and decrease the speed as you need.

There is no standard or correct sync speed, but if you are shooting under normal light inside studio or outdoor, default flash shutter speed, which is 1/60th of sec can be best choice and then you can manipulate your speed depending upon whether you want to capture the ambient light or avoid it. And if you want to change the default value in your camera settings, it is fairly an easy setup. If you are using Nikon D90, you have to go to CSM (Custom Setting Menu) and go to the Bracketing/flash and choose option e1. But if you are using D200, D300, D700 and other higher D-series like D2 or D3, you have to navigate through CSM and go to option e2.

How To Use AE-L/AF-L Button Correctly?

This post is a part of our Q&A section. If you want to submit your question, please use the form in the Contact page.

QA.jpg

Darren (London, UK) asked : What is the function of AE-L/AF-L button which is on the right side of the viewfinder on my Nikon D60. I read the camera manual but couldn’t grasp the concept of it. Can you write about its feature or may be how to use it and when to use it?

I wrote a blog on how to set AE-L/AF-L button on Nikon D90 and how does it work a while ago. Nikon’s all DSLRs including D60 share same theory about how it works but it depends on the situation when do you want to use it. Basically AE-L/AF-L stands for Auto Exposure Lock/Auto Focus Lock but you can use AE-L/AF-L button for many other different functions. You can even use this button to lock Flash value which we discussed in a earlier blog. Camera menu option and the button position on the camera may vary depending on the camera model, but you will find it under the CSM menu and probably you have to go under the Control option. If you want to see the details on how to set AE-L/AF-L button in your camera, you may want to check the blog post on How to set AE-L/AF-L button on Nikon D90. In this article, I am going to demonstrate the effect of Auto Exposure Lock feature with the help of couple photographs I took. Once you grasp the concept of it, you can apply the technique in similar situations.

Before applying Auto Exposure Lock (AE-L)

Before applying Auto Exposure Lock (AE-L)

My camera was in Aperture Priority mode and the metering system was in Matrix metering mode. That means camera metered the exposure based on the overall scene inside the frame. The white snow background gave the sense of a bright situation to the camera metering system and it calculated the Shutter speed accordingly. But when I took the picture, the main subject came out underexposed because the camera metering system couldn’t figured it out that the main subject was not as bright as majority of the frame.

After applying Auto Exposure Lock (AE-L)

After applying Auto Exposure Lock (AE-L)

To overcome this issue, I thought Auto Exposure Lock (AE-L) feature would be the best choice in this situation. Before activating the feature, I zoomed in little bit so that the brighter area in the frame will get reduced and the camera metering system won’t be fooled. After that I focused on the main subject and press the AE-L/AF-L button to lock the exposure at the current values. At this point, the camera metering system calculated the exposure values based on the relatively darker area because I eliminated the most of the snow by zooming into the subject. I then zoomed out (recomposed the shot) and took a picture with the locked exposure. This gave me a nicely lit subject and well exposed background. If you are not careful enough with the framing, you might end up getting some overexposed areas in the frame as well.

[Updated on 4/30/2019] Someone might argue that why don't we use spot metering instead of matrix metering and lock the focus on the subject’s face and meter the exposure. By doing so, camera is going to meter the light based on the spot where the focus is locked on and not the entire frame, which will then properly exposed the subject. Yes, it might work in some cases but not a good choice in every situation, and that is the exact reason I chose this picture to demonstrate the effect. If I use spot metering in this particular scenario, it will properly expose the subject but will also overexpose the snow area way too much than I would like it be.