Nikon Flash

Using Nikon's Built-in Flash In Different Metering Modes

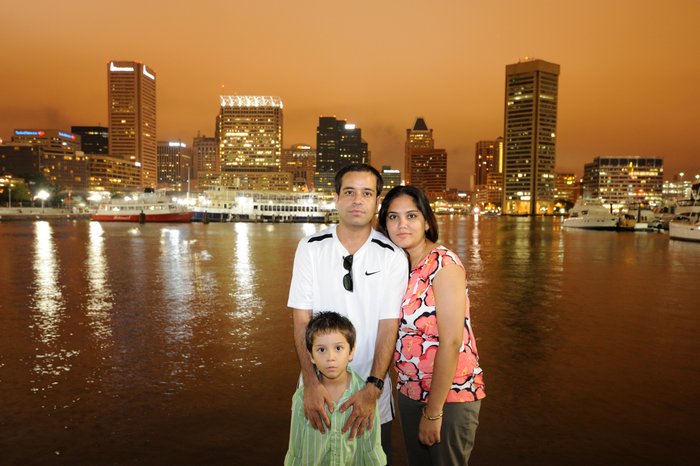
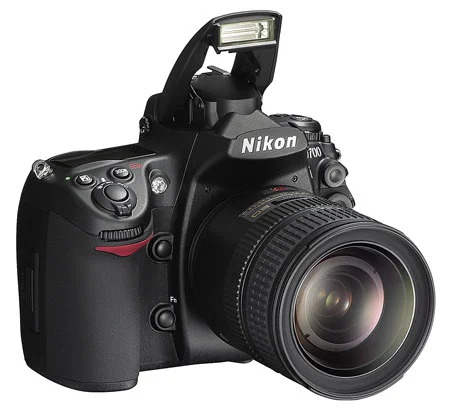
Almost all consumer level DSLRs and some of the pro level DSLRs come with the built-in flash. Professional photographers who shoot wedding, fashion, commercial portrait, or other special events do not rely on built-in flash to illuminate their subject. But, you don't have to use flash only when there is not sufficient natural light. It can also be used as a fill light to remove shadows or to add a catch light to the subject's eye. One of the best thing about the built-in flash is, you don't have to carry around an extra equipment and is always available on your camera, as long as the camera has sufficient battery power to charge and fire the flash. It can be put to use instantly whenever you want and doesn’t require any sophisticated setup. However, you need to understand few basics settings of your camera and should be comfortable navigating through the menu settings and the buttons on the camera.

Use of camera's built-in flash and its effect on the picture is determined by various settings on the camera, but most importantly, which metering mode you are currently using and what exposure mode you are on play a bigger role. Let's recap these camera metering modes briefly and then we can discuss about the steps we would be following in order to use on-camera flash. Since I wrote the blog about camera metering (in more detail) almost 9 years ago, Nikon has added a new metering mode; Highlight-Weighted Metering, which we will be discussing in the section below.

Read More

Understanding Flash Sync Modes - Which Sync Mode Should You Use?

Nikon DSLR cameras come with the five different shutter sync modes to work with the flash. Not all the exposure modes (S, A, P or M) come with the same flash sync modes but they are available in a slightly different variation depending on which exposure modes you are on. You might want to check your camera manual to find out which sync mode is available in which exposure mode. To change the flash sync mode in your camera, you can hold down the flash button (usually on the front left side of the camera body near the built-in pop-up flash unit) and rotate the main command dial. When I was first learning about these different types of sync modes, they sounded very confusing to me. After reading lots of articles and doing lots of practice on my camera and flash, I got the hang of it. If you are new to flash photography, I am sure it sounds confusing at the beginning. It is simple concept to understand yet confusing sometimes but let me explain them briefly and as clearly as I can. And if you already know about these modes and experimenting a lot with the flash, this might be a topic of interest to you as well.

Normal-Sync-Flash.jpg

1. Front Curtain Sync (Normal Sync) - In this mode, camera fires the flash as soon as the front shutter curtain (or first curtain) has been fully raised. It means camera fires the flash as soon as the window for the exposure is opened. Sometimes, it is also called firing the flash at the beginning of the exposure. When your camera is set to the Front curtain sync mode, the slowest (minimum) shutter speed it uses is 1/60th of a second (default to most of the DSLRs which you can change later by going into Flash shutter Speed menu inside the Custom Menu). This shutter speed is also called "Flash Shutter Speed". If your subject is in a low light condition, flash would be the only light for the exposure since the faster shutter speed cuts the ambient light. But if you are shooting with the Normal sync in a bright day light in an Aperture priority mode, your camera will try to use the fastest (maximum) shutter speed defined in "Sync Speed" which is usually 1/250th of a second. If you need a faster shutter speed than the sync speed, you will have to setup an Auto FP High Speed Sync which allows to sync your flash up-to 1/8000th of a second.

Front Curtain Normal Sync

Front Curtain Normal Sync

Normally, you should use the Front Curtain Sync when your subject is in a dark condition and flash is the only source of light and you don't care too much about the background. It is also widely used for standard studio setup where your only source of light is the flash light or the studio strobe.

Red-Eye-Sync-Flash.jpg

2. Red-eye Sync with Front Curtain - Have you ever noticed a red-eye effect while shooting a portrait? Usually, red-eye is caused by the light from the flash reflecting off the back of your subject's retina. When you are shooting close and with a straight flash, pop-up flash for example, it is very likely that you get the red-eye effect. And if your subject is in dark, red-eye gets worse because of the increased size of the subject's pupils (pupils get bigger to be able to see in the dark).

When you use the red-eye sync mode, depending on which flash system you are working with, camera will try to overcome the issue with a different technique. If you are using an external flash unit, camera fires series of quick light pulse just before the shutter opens. And if you are using a built-in pop-up flash, red-eye reduction is accomplished by illuminating camera's red-eye lamp, which is very bright and might be annoying to the subject. The best way to reduce the red-eye effect is by moving the flash unit away from the camera by using cords or wireless technology.

Slow-Sync-Flash.jpg

3. Slow Sync - Slow Sync mode allows you to use the flash to expose your main subject while getting the ambient light to expose the background or surroundings. The standard Slow Sync mode is the front curtain sync mode in which camera fires the flash at the beginning of the exposure and then keeps the shutter open for the ambient light exposure. Normal Slow Sync or Front Slow sync is used mainly when your subject is stationary. For example, if your subject is standing still in front of a building at night, you want to use the normal slow sync to illuminate the subject with the flash and then the shutter will be opened for the ambient exposure to illuminate the background.

Slow Sync Flash Photography

Slow Sync Flash Photography

If your subject moves during the exposure, you will get the motion blur due to the long exposure.

Using Slow Sync Normal Flash (ball was moving from the right to the left)

Using Slow Sync Normal Flash (ball was moving from the right to the left)

In this mode, since the flash is fired at the beginning of the exposure, it freezes the subject initially but if the subject starts moving while the shutter is still open to capture the ambient light, it produces a motion blur after subject is initially being frozen. Sometimes this can produce an interesting picture with the motion blur but it could be a distraction as well. So, you have to be really careful while using this mode for a moving subject.

Slow-Sync-with-Red-Eye-Flash.jpg

4. Slow+Red-eye Reduction Sync - This is a slight variation on the Red-eye reduction sync we discussed earlier. In this mode, flash fires at the beginning of the exposure freezing your subject and keep the shutter open for the ambient exposure. Since this mode is similar to the Normal Sync where flash fires as soon as the shutter is opened, red-eye reduction sync works exactly same as the previous case.

You should use this mode when you want to use on-camera pop-up flash to illuminate the subject and keep the background lit with the slower shutter speed by capturing the ambient light. The problem with this mode can be similar to that of slow sync mode where if subject moves right after the flash is fired, you get the motion blur due to the longer exposure setting (shutter is kept opened after the flash is fired for the exposure).

Slow-Rear-Sync-Flash.jpg

5. Slow+Rear Sync - This mode works exactly as the Slow sync mode except that the flash is fired at the end of the exposure just before the rear curtain (or second curtain) is closed rather than at the beginning. In this mode, the front curtain is opened first and the camera sensor starts collecting the ambient light and then just before the rear curtain begins to close, the flash fires. In this mode, the term "Slow" refers to the longer shutter speed and the "Rear" refers to the flash firing before the rear curtain closes.

Using Slow Sync with Rear curtain (ball was moving from the right to the left)

Using Slow Sync with Rear curtain (ball was moving from the right to the left)

This mode is widely used to include the motion blur as an effect rather than a distraction. For example, if you are taking a picture of a moving car (driving forward) using this mode, the shutter opens for the exposure and the car movement creates a blur effect but at the end just before the rear curtain is closed, flash will be fired to freeze the car motion. In this example, the motion blur seems natural giving the sense that car is moving forward leaving nice light trail behind. If we use the normal slow sync in the same scenario, the motion blur occurred at the front of the moving car making it as a distraction (also giving the sense that car is moving backward even though it is moving forward).

When you are using Slow Sync modes, it's best to dial down the flash power to balance the ambient exposure (you can see the ball is little overexposed in both of the examples above). You can test with -1 flash power and do some test shot and then adjust the flash power accordingly for proper balance between the flash and the ambient.

Note : This mode is only available in an Aperture Priority Mode (A) or the Program Mode (P) because these are the only modes where camera controls the shutter speed. But if you are using the Shutter Priority Mode (S) or the Manual Mode (M), you set the shutter speed and the camera can't adjust it independently and hence camera only uses a Rear Sync mode where camera still fires the flash at the end of the exposure just before the rear curtain is closed creating a nice trail effect in a moving subject.

Which Sync Mode should you use?

The most popular and the widely used sync modes are the Normal Sync mode and the Slow+Rear Sync mode. If you do not want the ambient light to contribute to the overall exposure of your photograph but want to expose the subject using the flash light, you should use the Normal Sync mode. And if you want to use the ambient light to expose for the background and the surrounding and illuminate your subject by using the flash light, you should use the Slow+Rear Sync mode. You can also use the Slow+Rear mode if you want to create a motion blur effect on the moving subject. While using Slow+Rear mode, even if motion blur gets produced without your intent, most of the time it gives a nice effect on the photograph rather than being a distraction. Red-Eye reduction methods are rarely used and their effect can be easily corrected during post-processing.

Five Different Ways Of Connecting External Flash To Nikon D7000

Nikon D7000 comes with a built-in flash which does pretty good job most of the time; specially when your subject is close, and you just need to fill the light. The power of the built-in flash is not enough to use it as a main source of light and this is when external flash comes handy. Nikon's every new DSLRs support external flash units but in addition, Nikon D7000 gives some extra options to connect external flash unit. Basically you have five different ways to connect an external flash unit to your Nikon D7000.

Nikon SC-29 TTL coiled remote cord

Nikon SC-29 TTL coiled remote cord

1. Mount on the accessory shoe: You can connect your flash unit to D7000 by sliding a compatible flash units into the accessory shoe, also called hot shoe. When you slide your flash unit to hot shoe, D7000 automatically detects Nikon speedlights and you can control it's function using camera menu options.

Nikon AS-10 TTL Multi-Flash adapter

Nikon AS-10 TTL Multi-Flash adapter

2. Connect to the accessory shoe with a cable: Instead of mounting your flash directly into accessory shoe, you can also use Nikon standard cables; Nikon SC-28 or SC-29 TTL coiled remote cords to connect flash units with Nikon DSLRs. These coiled remote cords have an accessory shoe on one end of nine-foot cable to accept flash, and a foot that slides into the camera accessory shoe on the other end, providing a link that is the same as mounting flash directly sliding into hot shoe. But using these cables gives you flexibility of placing flash units into different orientations than being fixed on top of the camera. It is useful when you want to experiment with direction of lights using wired connection between flash units and camera.

Nikon SC-26:27 TTL Multi-Flash Sync cord

Nikon SC-26:27 TTL Multi-Flash Sync cord

3. Connect using Multi-Flash cables: You can also use Nikon SC-27 or SC-26 TTL Multi-Flash Sync Cords to connect TTL flash units to each other or through the AS-10 TTL Multi-Flash adapter or SC-28 TTL remote cord for multi-flash operation. You may want to use this with older NIkon Flash units as it doesn't support i-TTL or D-TTL operation.

Nikon AS-15 Sync Terminal Adapter

Nikon AS-15 Sync Terminal Adapter

4. Connect to a PC/X connector: Nikon D7000 doesn't have built-in PC sync connector, but Nikon offers an optional adapter, Nikon AS-15 Sync Terminal Adapter, that clips into hot shoe and provides a PC/X connector which can be used with studio strobes. These adapters are useful when they are combined with a voltage limiter so that you don't need to worry about frying your camera with an older flash units that has a triggering voltage that's too high.

Note: According to B&H online store, AS-15 Sync Terminal Adapter doesn't provide high-voltage sync protection, and is not recommended for flash units that have more than 6v.

5. Connect using Wireless technology: Nikon D7000 has a commander mode option which lets you trigger most of the Nikon speedlight units wirelessly. Using commander mode, these speedlights can be triggered by another master flash in commander mode or by the RU-800 infrared device. You can also use third party wireless device such as RadioPopper JrX or PocketWizards wireless flash triggers which are pretty much dominant in the market.