I am a big fan of Nikon CLS technology and Nikon impressed me once again with it’s newly announced small and compact but powerful lighting system, SB-700. This flash unit lives up to the Nikon legacy. I always repeat the fact that photography is all about adjusting the composition and the lights. To support this fact, most of the DSLRs come with a built-in flash but the features they provide is very limited. That's why it is almost necessary to have an external flash unit which can provide creative control over any given lighting condition. If you are using a Nikon DSLR, you have many options to choose from; SB-R200, SB-400, SB-600, SB-700, SB-800 or SB-900. The Nikon Speedlight SB-700 is the newest addition to the Nikon flash lineup and can be considered as a replacement for SB-600. I was using a SB-600, which worked fine, but the SB-700 was just a great upgrade. Let’s talk briefly about this new gadget from the Nikon.
Nikon’s SB-700 is a compact flash unit but filled with features that SB-600 lacks and some of the features are inherited from more professional flash unit like SB-900. The built and the design of the unit looks professional, supports commander mode, capable of multi-step auto zoom up to 120 mm. It is designed with high-speed recycling time of 2.5 seconds with the NiMH batteries and 3 seconds with the Alkaline batteries. The built size of Nikon SB-700 (2.8 × 5.0 × 4.1 in) is a bit larger than SB-600 but smaller than SB-900 unit. However, it resembles more with SB-900 and shares some of the features and the control layout with SB-900 as well. The interface on the SB-700 is much more straight forward than the SB-600 which requires you to push two buttons at the same time to get into the menu items and configure the flash unit. The SB-700 is a much easier and faster unit to setup and has more features than the SB-600.
SB-700 is redesigned with the interactive control and very easy to setup and use. As I mentioned before, some of it's features and even controls are borrowed from SB-900. It has a nice LCD screen on the back and includes two mode switches on the left and the right side of the LCD screen which allow user to change modes without navigating through all the menu items. The SB-700 comes with the incandescent and the fluorescent filters for the color balance when shooting indoors. The SB-700 automatically detects the type of filters in use and adjusts the settings accordingly. It also comes with a built-in bounce card that can be used for the bounce flash effects and the diffusor to soften the intensity of lights.
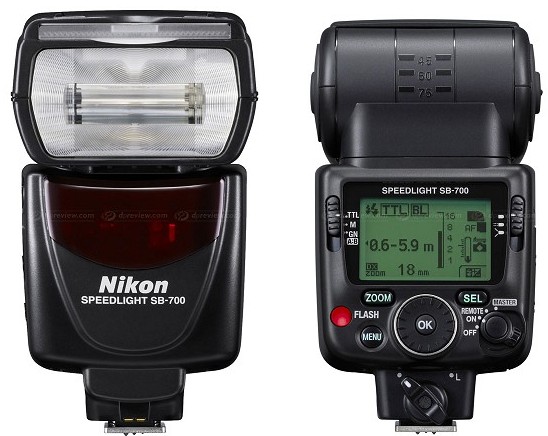
Nikon Speedlight SB-700
Features & Performance
1. Automatically senses the FX or the DX-Format camera in use and optimizes the light distribution.
2. Automatically identifies the mounted hard type color filters and adjusts the camera white-balance.
3. Works with the Nikon’s i-TTL (intelligent through-the-lens) metering system. This system works by firing a series of flash bursts to assist the camera in analyzing the scene. The camera’s metering system then processes this information and sends it back to the flash unit, balancing the flash output with the ambient light.
4. Using the simple slider switch on the back of the SB-700, you can optimize the light quality by selecting the Standard for general illumination, Center-weighted for portraits or Even, for groups or interiors.
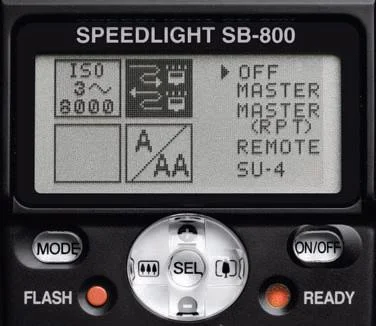
5. Most of the newer entry level Nikon DSLRs do not have a commander mode to remotely control the flash Off Camera. And in that case, SB-700 can be used as a commander flash unit as well to control multiple wireless flash units.
6. SB-700 has a built-in thermal cut-out detection feature to prevent it getting damage from overheating. It works by extending the recycling time when SB-700 detects the heat build-up.
7. Flash Value (FV) Lock feature locks in a specific flash output on the main subject, regardless of the aperture, composition or the lens’ zoom position.
All in all, I highly recommend this flash over the SB-600. I wanted to get the SB-900 but its just too big and heavy for my needs and also couldn't justify the additional cost as well.