
This post is a part of our Q&A section. If you want to submit your question, please use the form in the Contact page.

Lena (PA, USA) asked : Can you please talk about the light painting and what camera settings do I need for it?
I want to start with explaining what is the light painting for those who are new to this photography phenomenon. Simply, light painting (also known as the light drawing or the light graffiti) is a photographic technique usually done in a dark place by moving a hand-held light source while the camera is opening the shutter for a longer period of time with the long exposure settings. It is called the light painting because you are actually painting over the solid surface or on the air using the hand-held light source while camera is recording the movement and creates a painting on the frame.
Before you start the light painting, these are the recommended accessories to have with you.
1. Tripod (very important to avoid any camera shake during the painting).
2. Remote shutter release cable or the wireless remote control for a smooth operation.
3. Light source (usually a torch light).
Once you have all the necessary things, you can set it up and adjust the camera settings for the shooting. Whenever you go out to shoot night photographs or fireworks, you need a long exposure settings to get the light effects. Light painting generally requires even more longer exposure (30sec to 60sec or even more). This technique requires a lot of practice and experiment before you get the desirable result. To start with, you could try using the Shutter Priority Mode which allows the camera to set an aperture value required for the proper exposure. The only limitation with this set up is, most of the DSLRs support to have only 30 seconds of the exposure in this mode. If in case you need a longer exposure, you will actually want to put the camera into the Manual Mode by turning the mode dial into M. When you are dialed into the Manual (M) mode, you can set the shutter speed into the BULB mode so that you can set the shutter speed longer than 30 seconds. In the BULB mode, shutter is opened right after you press the shutter release button and keeps it open until you let go the shutter release button.
Let’s talk about the camera settings for the light painting.
1. Set the camera mode into the Manual Mode (M).
2. Set the camera shutter speed to 30 seconds or to the BULB mode if you feel like you need an extra long exposure.
3. Adjust the lens aperture value relative to the shutter speed for the proper exposure. This part is little bit tricky to get it right for the first few times. You have to keep experimenting with different values until you get the shot you want.
4. Keep the ISO value low to support the long exposure and reduce the possible noise.
After everything is properly set, mount the camera on the tripod, position yourself (with the torch light) on the frame and when you are ready to paint, click the shutter release button. Once the shutter is open, you can start moving with the light source, virtually creating something on the air, until the shutter is closed. While moving the lights, you have to be careful with the speed of the movement. The area in the frame where you slow down the light movement, you will get the brighter pixels. That being said, you don't want to hold the light in the same position for a long time otherwise you will get the overexposed photograph. Also, if you move the light too fast in a long exposure shot, the line might not be continuously formed to give you the structure you want. One more thing to remember; if you set the shutter speed into the BULB mode, you have to manually click the shutter release button once again to close the shutter. Once you close the shutter, camera will process all the light movements and write that information to the sensor to form an image on the frame.
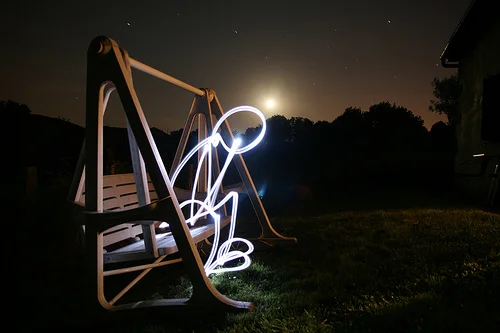
Image Credit : rafoto (flickr)
Exposure : 70 sec Aperture : f/2.8 Focal Length : 17mm ISO : 200
Once you get the idea, you can keep experimenting with it until get the better results. I have tried it few times but never got succeeded to paint it perfectly. I might try again sometimes in the future but until then, enjoy this beautiful and inspiring shot from rafoto.


