Remote shutter release method will come handy when you want to capture a fireworks, do night photography or any other kind of long exposure shooting where the movement of the camera will be the reason to get blurred image. If you want to trigger the camera shutter remotely, you have two options; one is to use a wired remote shutter release cord and the other one is to use a wireless remote control device. Few months ago, I wrote a blog about Nikon MC-DC2 wired remote shutter release cord and today I want to write about my experience with the wireless remote control device, Nikon ML-L3, to remotely control the shutter release. There are a lot of rumors and speculations about using the wireless remote control but I will express my opinion based on my own experience about the accessory and get your feedback as well.
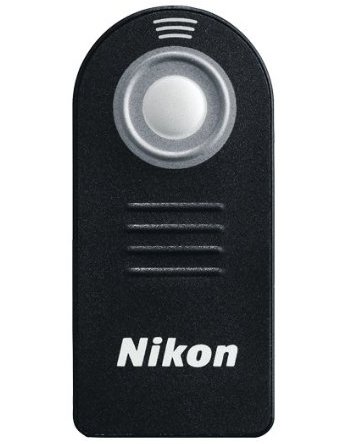
Nikon ML-L3 Wireless Remote Control
In the past few weeks, I read some reviews about the ML-L3 where reviewers mentioned that it has to have a proper line of sight with the camera IR sensor to trigger the camera shutter remotely otherwise the device won’t work. If you are buying it without knowing this limitation of the IR technology, you might be disappointed with your decision. I think it is a limitation of using any system that works in a Infrared technology that the line of sight is a must for it to work. If the remote is completely out of sight with the camera, it might not work at all but in my experience, I have worked it out by trying from different angle pointing towards the camera. And the other feature that many people are concerned about is it's Autofocus feature. There is no doubt that this remote is able to autofocus the lens before triggering the shutter but it will not re-focus if the shutter release button has already been pressed halfway down to focus the subject. To focus using a wireless remote control, it would be better to compose your shot but do not press the camera's shutter release button half way down to focus it but instead, use the wireless remote control unit.
When you purchase the device, it might not come with the instruction to properly setup and connect the device with the camera. Here is a brief instruction on how to sync your wireless remote control with your DSLR camera.
How to use ML-L3 Wireless Remote Control?
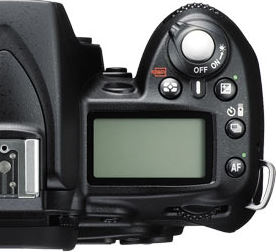
Nikon D90 Top View
To setup a wireless remote shutter with the camera, most of the Nikon DSLRs come with the menu option. If you go to the Custom Settings Menu (CSM) with the pencil icon, you will see the Release mode. This is where you can specify which method you want to use to release the shutter button. With the Nikon D90, its even easier than that. D90 and many other new DSLRs come with the release mode button just to the right side of the LCD panel. This button has a set timer icon and a wireless remote icon nearby. While pressing that button, you have to rotate the main command dial to change your release mode option. Nikon D90 gives you four different options when you rotate the command dial. You can choose for a single shot, continuous shooting, shoot in a timer mode or wireless remote mode. Once you change your release mode option to the wireless remote (it will display a wireless remote icon on the LCD), you are ready to use the wireless remote control to trigger the shutter remotely.
Nikon ML-L3 Wireless Remote Control supports Nikon P7000, D3000, D40, D40x, D50, D5000, D60, D70, D7000, D70s, D80 & D90 Digital SLR Cameras.