Understanding White Balance In Digital Photography

White Balance (WB) is the technique of managing colors in your picture. Unwanted colors which appears in the photograph are unpleasant and the process of removing or editing such insignificant colors is called the White Balance. White Balance is used to manage the color temperature, contrast, warmness of colors etc to get the real color tones. Digital cameras sometime get deceived with the light source and produces unpleasant photograph by mixing different colors in your photograph. Many photographers do not care about this option and they edit the colors during post-processing. But, in my view, its always worth to know about any technique that your camera has to offer so that you can apply it on the fly whenever you need it and probably save some editing time as well.

The basic principle and the simple reason we adjust the white balance is to get the colors of the photograph as accurate as possible. Most of the time, Auto White Balance works perfectly. But in some cases, applying Auto White Balance may produce extra orange, green or blue colors in your photograph. When we see subject with a naked eye, we see it pretty normal but camera's sensors apply different color settings to the photograph based upon different light sources. For example fluorescent light affects photographs with blue color whereas tungsten light source (Incandescent/Bulb) produces yellow color in your photographs. We can correct this problem with the help of White Balancing technique.

Bulb-Before.jpg

Photograph affected by the Bulb light source

Bulb-After.jpg

Photograph after adjusting the White Balance

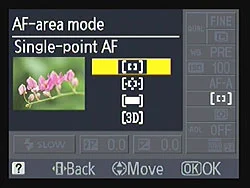
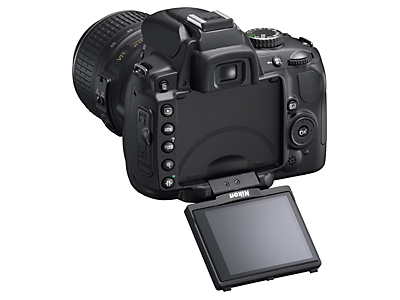
Today's advanced DSLR cameras have many more pre-defined White Balance settings. Nikon D90 also comes with many White Balance options such as Auto WB, Incandescent, Fluorescent, Direct sunlight, Flash, cloudy, Shade, Choose color temp or Preset Manual White Balance. You can choose different Balance techniques depending upon the light condition you are shooting at.

Personally, I shoot RAW images if I doubt the lighting condition and then edit the White Balance later during post-processing.

Advantage of Shooting RAW Images

If you have a doubt on the given lighting condition, you may choose to shoot in a RAW Format and then edit those RAW images during post-processing. When you shoot picture in a RAW format, you will get the exact image taken by the camera's sensor without applying any adjustments like White Balance, Active D-lighting etc. In fact, camera will bypass all these settings and gives you RAW image. This is the beauty of shooting in a RAW format; let the camera take picture as it likes and edit them later on the computer.

And just in case if you want to shoot in a JPEG Format to save some space on your camera memory or for any other reason, Auto White Balance does a pretty good job most of the time. You can always take a shot, preview it on the LCD screen, set the white balance to one of the available presets and take another shot again.

Understanding An Autofocus Mode In Modern DSLR Camera

Autofocus is one of the great features available in modern DSLR camera. Some cameras are equipped with an Autofocus motor inside the camera and some are not. Similarly, there are lenses which come with the built-in Autofocus motor inside itself. Benefits of having an Autofocus motor inside the camera is that it can Autofocus the lens which doesn't have a built-in Autofocus motor. Nikon D40, D40X, D60, D3000 and D5000 models lack an Autofocus motor. But Nikon D90 does have an Autofocus motor built-in inside so that it can fully Autofocus the lenses which lack an Autofocus motor. There are two ways for the DSLR camera to focus the subject; manually and automatically. When your lens is setup to focus automatically (by using the switch available on the lens), camera offers few different ways to achieve that autofocus.

Different camera brands provide different kind of Autofocus mode and sometimes only the naming is different but the core functionalities are same. Most of the Nikon DSLRs including D90 come with the three different Autofocus modes and one Manual mode. To change between different Autofocus mode in D90, you have to press the AF button on the top of the camera near the monochrome LCD screen and rotate the main command dial. While changing the modes, you can see currently selected Autofocus mode on your top LCD screen as well. Most of the high end semi-pro or pro DSLRs come with the dedicated lever to switch/lever between different autofocus modes. Now, let's discuss about these different autofocus modes and when should we use them.

D700 Autofocus switch

D700 Autofocus switch

1. AF-S (Autofocus Single)

In this mode, focus is set once when you press the shutter release button halfway down and the camera keeps the focus locked on the subject until the shutter button is fully pressed to take a picture. If you release the shutter button without taking a picture, you will have to re-focus again to take the picture. This mode will be your best choice if you are shooting subjects that do not move such as landscapes, cityscapes or portraits etc. In this mode, by default, you might not be able to take a picture until the focus is locked on the subject.

2. AF-C (Autofocus Continuous)

This mode is good if you are shooting moving subjects like in wildlife and sports photography. When the camera is set to AF-C mode, once the shutter release button is pressed halfway down, the camera sets the focus on the subject but continues to monitor the subject in order to re-focus if it's moved from the original position. While shooting using AF-C mode, focus and exposure aren't really locked until you press shutter release button all the way down to take a picture. In this mode, by default, you can take a picture even if camera has not fully focused the subject but you end up getting blurry images.

3. AF-A (Autofocus Automatic)

This mode is actually a combination of the two modes described above. When your camera is set to AF-A mode, camera focuses subject using AF-S mode if the subject is not moving but it changes automatically to AF-C mode if subject starts moving. Isn't that pretty cool? This mode is pretty good when you are shooting mixture of the actions. This mode is probably the default mode in your camera. However, like in AF-S mode, subject needs to be sharply focused to release the shutter release button all the way down and then only camera takes the picture.

4. Manual Focus

You can use the manual focus mode when your lens is set to the manual focusing mode (using the switch on the lens itself) or if your lens is not equipped with an Autofocus motor. In this mode, you can manually focus your subject using the focusing ring on the lens barrel. Manual focus is popular among the landscape photographers specially when they want to achieve sharp focus from the foreground to the background (some prefer to focus into infinity and some prefers to focus into one third of the frame to achieve everything in focus).

Some photographers like to shoot in a manual focusing mode all the time but I prefer to use Autofocus mode most of the time except in some tricky landscape shot where I also use manual focus.

Nikon D5000 Vs Nikon D90

With the release of Nikon D5000 DSLR camera, market is buzzing with it's new features and comparison to other cameras in the market. I meet increasing number of people everyday getting into photography and the release of this new camera, Nikon D5000, is targeting those customers who are fresh and want to get into photography or upgrade themselves from point and shoot cameras. I started with Nikon D60 and later upgraded to D90. When I bought my first camera, I also did lots of comparison between different brands and the models of same brand. It is always confusing task to compare when you are not sure what exactly you are looking for on your first camera. But if you already know the specification you are looking for, your task is half completed and the next question would be comparison between the price of two. Since the release of Nikon D5000, it has been compared to the models of different brand or even within Nikon lineup. Since, I haven’t used other brand DSLR yet, I am trying to compare it with my own D90 and see how it differs to each other from different perspective.

People started comparing these two products because it has similar features. Due to rapid technological innovation, D5000 seems to have even more features than D90 and the price is much lower. But when you look more closely about the features avaialble in Nikon D90 and it's flexibility over the situation, there is no doubt that D90 is the best camera for the price you pay. But let’s discuss some of the key differences I found out during my research about these two cameras.

Nikon D5000

Nikon D5000

As I mentioned earlier, Nikon D60 was my first DSLR camera which I bought almost 18 months ago. And D5000 is considered as a replacement for D60 with some add-in features. D5000 offers more features than D60 like vari-angle color LCD monitor, 12.3 MP picture quality, records 720p HD movie with sound, 19 Auto-exposure Scene Modes, Live view, GPS Geo-tagging, 15.8 x 23.6mm size CMOS sensor like in D90 and many more. D90 lacks some of the features of D5000 like 19 Auto-exposure modes, vari-angle color LCD etc.

The main features that D5000 lacks over D90 are wide range of lens compatibility, off-camera flash control, dedicated buttons that allow immediate access to the settings. Nikon D90 has a built-in AF motor which gives the capability to support wide range of lens available in the market. This is one of the most important feature to be considered that D5000 doesn't have. When the camera has a built-in focus motor in it, it can utilize the AF lens for autofocus that doesn't have a motor inside the lens itself. Since D5000 doesn't have a AF motor inside the body, if you use AF lens with it, you have to manually focus. Next thing I noticed is Nikon D90 has a commander mode which allows you to control off-camera flash using the built-in camera flash. When you setup a commander mode in D90, you can actually use the built-in camera flash to send a signal over the air and control off-camera flash. This is pretty impressive feature and lot of time specially when we do indoor shooting, we use this feature for proper light setting. D90 has dedicated buttons for frequently used settings like ISO, preview of DoF, White Balance etc. Instead of navigating through menu setup, you can use those dedicated buttons to change your settings which is very handy and useful when you are in a hurry to capture the shot.

D90 has many other features that most of the people may not use in daily shooting but it is worth to have it there in-case if you need it. But that doesn't mean D5000 is a bad camera at all. Actually, Nikon D5000 comes with more features in affordable price. When it is time for you to decide which camera should you be buying, you have to answer few question to yourself; what do you want from your new camera and what is your budget? If you own point and shoot camera and want to upgrade, D5000 might be the perfect choice at this moment but if you already own one of the DSLR body like D40 or D60 for example and want more features, then probably getting Nikon D90 will be the best option.