In my previous blog post, we discussed about the shutter speed and it's effect on the exposure. Now, lets discuss about an Aperture, one of the three pillars in photography along with the shutter speed and an ISO, and it's relation with the shutter speed in exposure setting. To set an aperture value, your camera should be either in Aperture Priority mode (A) or in Manual Mode (M). If you are using an Aperture priority mode, you change an aperture value and the camera adjusts the shutter speed automatically to balance the exposure. And if you are using Manual mode, you can set the shutter speed and an aperture value independently. I already discussed about ISO and shutter speed in my previous blogs and today I am going to explain about an Aperture and how it affects our photographs.
What is an Aperture?
When the shutter is opened to allow lights into the censor, light must pass through a window called an Aperture. Sometime it's compared with the pupil in a human eye. Wider the aperture, more lights come into the censor and vice versa. An Aperture is also called a F-stop and it's value is called F-stop value. F-stop value is indicated by f and followed by the number value.

F-STOP Values
For example f2.8 (also written as f/2.8) means wider aperture and allows more lights. Similarly f22 means narrow aperture and allows less lights into the censor. Difference from one aperture value to immediate next value is called one full stop value. This term is frequently used when we deal with the exposure setting. For example, if your lens F-stop value is in f2.8, f4, f5.6, f8, f11, f16 and f22 series, moving an aperture from f2.8 to f4 is called one full stop and decreases the brightness of your picture by one full stop (it will allow only half amount of lights than in f2.8). So once again, changing an aperture value by one full stop up (from 2.8 to 4) will allow half the light and one stop down (from 4 to 2.8) will double the amount of light hitting to the censor of the camera. To calculate the aperture values in a full stop value (1 EV), you can use the formula below.

Nowadays, in modern digital cameras, aperture value, shutter speed and ISO values can be set in a fractional value rather than one full stop value. Almost in all modern digital SLRs, these exposure values can be adjusted and decreased or increased in the faction of one-third, two-thirds or one full stop value. The most common fractional value is one-third stop (1⁄3 EV) but some cameras use half-stop value as well. If you look at the diagram above, we jumped the aperture value from f/2.8 to f/4 which is one full stop change. But, if you want the aperture one-third stop smaller than f/2.8, you would set the aperture value to f/3.2 and if you want two-thirds smaller, it would be f/3.5, and finally one full stop would be f/4. The next few f-stops in this sequence would be f/4.5, f/5, f/5.6, f/6.3, f/7.1, f/8, etc. which can be calculated by using the formula below.

And if you want to calculate the aperture values in half-stops, you can use the formula below.

What is Depth of Field?
Depth of field is an effect of using different aperture settings. When you use a small aperture value (that means wide opening of the lens and allows more lights), you will get the sharper image of a small area or the foreground area and the blurry image of the background area. Less aperture value means less area of the subject will be in focus and results into shallow depth of field. But when you use big aperture value (that means narrow opening of the lens and allows less lights), more wider area is in focus and everything that you see through the view finder will be in equal focusing mode resulting into deep depth of field. Generally, we use shallow depth of field while shooting macro objects like flowers, insects etc and deep depth of field is required while shooting landscape to be everything from foreground to background in focus.
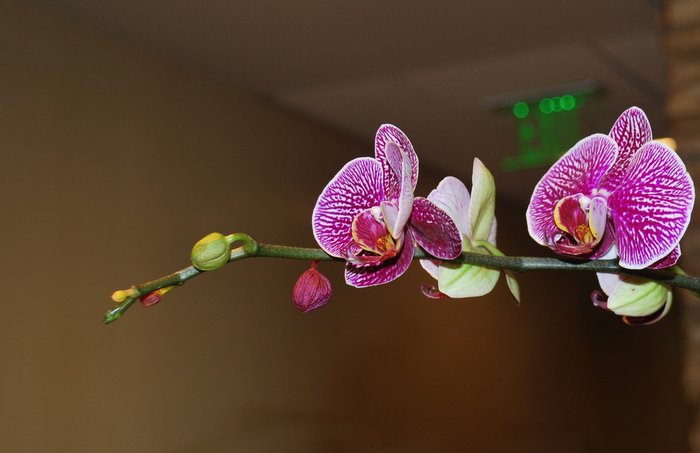
Shallow depth of field
Shallow Depth of Field
Focal Length - 32mm Shutter speed - 1/60 Aperture - f5 ISO - 200

Deep depth of field
Deep Depth of Field
Focal Length - 85 mm Shutter Speed - 1/2 Aperture - f/16 ISO - 200
Take and Give relation
Exposure can be set by changing an aperture value, shutter speed or different combination of shutter and aperture value. When you take one F-stop from an aperture, you can give one F-stop to the shutter speed to match the same exposure. Moving from one shutter speed to another one is also one full F-stop jump like in an aperture value.
Aperture Full Stops:
1, 1.4, 2, 2.8, 4, 5.6, 8, 11, 16, 22, 32, 45, 64
Shutter Full Stops:
1/1000s, 1/500s, 1/250s, 1/125s, 1/60s, 1/30s, 1/15s, 1/8s, 1/4s, 1/2s, 1s