Q & A

How To Tell My Camera To Focus On Particular Area?

This post is a part of our Q&A section. If you want to submit your question, please use the form in the Contact page.

QA.jpg

Lita (Manila, Philippines) asked :  When I am taking pictures of wildlife, I use Autofocus (AF) most of the time for obvious reasons. And most of the time when I try to frame and focus the animal, trees and branches get focused instead of the main subject. How can I force my Nikon D90 to focus on particular area?

Lita, if you do not want camera taking the control of the focus, short and quick answer is to manually focus the subject. When you manually focus using the focusing ring on the lens barrel, you can select the area to be in focus whether it would be in the middle of the frame or at any other focus point. But we all know that focusing manually is not a practical solution specially when you are shooting wildlife and that is the reason our DSLRs come with the autofocus option to quickly focus your subject. And autofocus works perfectly in most of the situations but sometimes you may encounter the problem you have described in your question. When you are using the Manual Focus mode, you can take over the control of the focusing system but the good news is that, your camera Nikon D90, may have a solution for the AF users as well.

Nikon D90 Back View.png

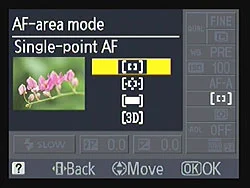
When you are shooting in Autofocus mode and want to take the control of the focusing system, you need to change the Autofocus option inside the Custom Setting Menu (CSM). By default, Nikon D90 selects the focus point automatically based on the information it gets through the lens and that was the reason, sometimes, you were encountering the focusing issue. And the reason is, your camera can not differentiate between the subject and the object inside the frame. To change that default setting, press the MENU button on the back of your camera and go to the CSM menu (Pencil Icon). Then choose the first option (a Autofocus) and select the Single Point. When you select the autofocus point to a single point, you can now select the focus point by using the Thumb Pad (Multi-selector button) on the back of your camera and lock the focus point wherever you want by using the AF Selector Lock lever next to the LCD screen. This guarantees that the camera is focusing on your intended subject because you've told it in advance which of the 11 AF points to use for the focusing.

Wild-Cat1.jpg

Note: If you want to lock the focus point into one spot, please make sure that the lever next to the LCD screen is switched to the L (Locked) position after you select the preferred focus point, otherwise, you might inadvertently select a different AF point by bumping into the thumb pad. The lock switch was designed to prevent such accidental change of the focus point and works really well. Your camera locks the focal point in L position of the lever switch and allows you to change focus point when the lever is set to the Unlocked (Single DOT) position.

How To Paint With Lights?

This post is a part of our Q&A section. If you want to submit your question, please use the form in the Contact page.

QA.jpg

Lena (PA, USA) asked : Can you please talk about the light painting and what camera settings do I need for it?

I want to start with explaining what is the light painting for those who are new to this photography phenomenon. Simply, light painting (also known as the light drawing or the light graffiti) is a photographic technique usually done in a dark place by moving a hand-held light source while the camera is opening the shutter for a longer period of time with the long exposure settings. It is called the light painting because you are actually painting over the solid surface or on the air using the hand-held light source while camera is recording the movement and creates a painting on the frame.

Before you start the light painting, these are the recommended accessories to have with you.

1. Tripod (very important to avoid any camera shake during the painting).

2. Remote shutter release cable or the wireless remote control for a smooth operation.

3. Light source (usually a torch light).

Once you have all the necessary things, you can set it up and adjust the camera settings for the shooting. Whenever you go out to shoot night photographs or fireworks, you need a long exposure settings to get the light effects. Light painting generally requires even more longer exposure (30sec to 60sec or even more). This technique requires a lot of practice and experiment before you get the desirable result. To start with, you could try using the Shutter Priority Mode which allows the camera to set an aperture value required for the proper exposure. The only limitation with this set up is, most of the DSLRs support to have only 30 seconds of the exposure in this mode. If in case you need a longer exposure, you will actually want to put the camera into the Manual Mode by turning the mode dial into M. When you are dialed into the Manual (M) mode, you can set the shutter speed into the BULB mode so that you can set the shutter speed longer than 30 seconds. In the BULB mode, shutter is opened right after you press the shutter release button and keeps it open until you let go the shutter release button.

Let’s talk about the camera settings for the light painting.

1. Set the camera mode into the Manual Mode (M).

2. Set the camera shutter speed to 30 seconds or to the BULB mode if you feel like you need an extra long exposure.

3. Adjust the lens aperture value relative to the shutter speed for the proper exposure. This part is little bit tricky to get it right for the first few times. You have to keep experimenting with different values until you get the shot you want.

4. Keep the ISO value low to support the long exposure and reduce the possible noise.

After everything is properly set, mount the camera on the tripod, position yourself (with the torch light) on the frame and when you are ready to paint, click the shutter release button. Once the shutter is open, you can start moving with the light source, virtually creating something on the air, until the shutter is closed. While moving the lights, you have to be careful with the speed of the movement. The area in the frame where you slow down the light movement, you will get the brighter pixels. That being said, you don't want to hold the light in the same position for a long time otherwise you will get the overexposed photograph. Also, if you move the light too fast in a long exposure shot, the line might not be continuously formed to give you the structure you want. One more thing to remember; if you set the shutter speed into the BULB mode, you have to manually click the shutter release button once again to close the shutter. Once you close the shutter, camera will process all the light movements and write that information to the sensor to form an image on the frame.

Image Credit : rafoto (flickr)

Image Credit : rafoto (flickr)

Exposure : 70 sec    Aperture : f/2.8    Focal Length : 17mm    ISO : 200

Once you get the idea, you can keep experimenting with it until get the better results. I have tried it few times but never got succeeded to paint it perfectly. I might try again sometimes in the future but until then, enjoy this beautiful and inspiring shot from rafoto.

What Feature Do You Assign To The Function Button?

This post is a part of our Q&A section. If you want to submit your question, please use the form in the Contact page.

QA.jpg

Deepak (Mumbai, India) asked : What camera feature do you prefer to be assigned to the function button on a DSLR camera?

Deepak, to be honest with you, your question forced me to go back and see what are the other options available in the menu to assign to the function button. I always assigned only two of my favorite options and never looked back into other options. In the first part let me talk briefly about what is the function button and why should we use it? And in the second part I will explain what feature do I assign to the function button and why?

Nikon D90 Function (Fn) Button

Nikon D90 Function (Fn) Button

Function button allows you to change the particular camera setting without going deep down to the menu options. Once you assign the function button to the specific feature, whenever you press the function button, camera will adjust the setting for that particular shot. This feature comes very handy when you want to quickly alter the camera setting without wasting too much time navigating through the menu tree. Now let’s discuss how to assign one of the camera’s feature to the function button. In this example, I am taking Nikon D90 to refer to the menu items. If you use some other DSLR, your menu navigation might be little different.

Step 1 : Press the MENU button on the back of your camera

Step 2 : Go the Custom Settings Menu (pencil icon) and navigate down to f (controls).

Step 3 : Select f3 (Assign FUNC. button).

You have varieties of options available there such as spot metering, +RAW, matrix metering, center-weighted metering, flash off, framing grid, AF-area mode etc. Personally, my favorites are spot metering and +RAW mode. Why? Because I set the metering mode to the matrix metering by default and sometimes if I want to give the credit to the center of the subject for the metering purpose, I want to use the spot metering. When I am ready to shoot, I would then press the Fn button and the camera will use the spot metering for that particular shot and go back to the regular setting as soon as the picture is taken. And the same is true for choosing the +RAW mode as well. When I was beginning to learn the basics of photography, I always shot in JPEG Fine mode but once in a while I also took the RAW images to edit the picture later on the computer and learn more about the post-processing tools and techniques. So, whenever I wanted to take the RAW image, I pressed the function button and shoot with JPEG Fine+RAW mode for the particular shot so that the camera takes JPEG and RAW versions of the image and stores them into the memory.

You can play around with the options your camera has and decide which one you want to stick with for regular use. Thank you again for your question from which I also got chance to learn about other options my camera has. Happy shooting!