How To Paint With Lights?

This post is a part of our Q&A section. If you want to submit your question, please use the form in the Contact page.

QA.jpg

Lena (PA, USA) asked : Can you please talk about the light painting and what camera settings do I need for it?

I want to start with explaining what is the light painting for those who are new to this photography phenomenon. Simply, light painting (also known as the light drawing or the light graffiti) is a photographic technique usually done in a dark place by moving a hand-held light source while the camera is opening the shutter for a longer period of time with the long exposure settings. It is called the light painting because you are actually painting over the solid surface or on the air using the hand-held light source while camera is recording the movement and creates a painting on the frame.

Before you start the light painting, these are the recommended accessories to have with you.

1. Tripod (very important to avoid any camera shake during the painting).

2. Remote shutter release cable or the wireless remote control for a smooth operation.

3. Light source (usually a torch light).

Once you have all the necessary things, you can set it up and adjust the camera settings for the shooting. Whenever you go out to shoot night photographs or fireworks, you need a long exposure settings to get the light effects. Light painting generally requires even more longer exposure (30sec to 60sec or even more). This technique requires a lot of practice and experiment before you get the desirable result. To start with, you could try using the Shutter Priority Mode which allows the camera to set an aperture value required for the proper exposure. The only limitation with this set up is, most of the DSLRs support to have only 30 seconds of the exposure in this mode. If in case you need a longer exposure, you will actually want to put the camera into the Manual Mode by turning the mode dial into M. When you are dialed into the Manual (M) mode, you can set the shutter speed into the BULB mode so that you can set the shutter speed longer than 30 seconds. In the BULB mode, shutter is opened right after you press the shutter release button and keeps it open until you let go the shutter release button.

Let’s talk about the camera settings for the light painting.

1. Set the camera mode into the Manual Mode (M).

2. Set the camera shutter speed to 30 seconds or to the BULB mode if you feel like you need an extra long exposure.

3. Adjust the lens aperture value relative to the shutter speed for the proper exposure. This part is little bit tricky to get it right for the first few times. You have to keep experimenting with different values until you get the shot you want.

4. Keep the ISO value low to support the long exposure and reduce the possible noise.

After everything is properly set, mount the camera on the tripod, position yourself (with the torch light) on the frame and when you are ready to paint, click the shutter release button. Once the shutter is open, you can start moving with the light source, virtually creating something on the air, until the shutter is closed. While moving the lights, you have to be careful with the speed of the movement. The area in the frame where you slow down the light movement, you will get the brighter pixels. That being said, you don't want to hold the light in the same position for a long time otherwise you will get the overexposed photograph. Also, if you move the light too fast in a long exposure shot, the line might not be continuously formed to give you the structure you want. One more thing to remember; if you set the shutter speed into the BULB mode, you have to manually click the shutter release button once again to close the shutter. Once you close the shutter, camera will process all the light movements and write that information to the sensor to form an image on the frame.

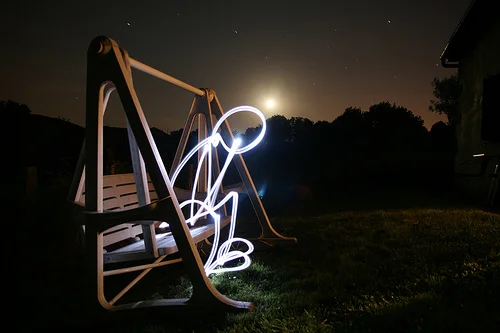
Image Credit : rafoto (flickr)

Image Credit : rafoto (flickr)

Exposure : 70 sec    Aperture : f/2.8    Focal Length : 17mm    ISO : 200

Once you get the idea, you can keep experimenting with it until get the better results. I have tried it few times but never got succeeded to paint it perfectly. I might try again sometimes in the future but until then, enjoy this beautiful and inspiring shot from rafoto.

RGB Histogram And Highlight Overexposure Warning

Last time we discussed about the Histogram graph and it's significance in modern digital photography. I also mentioned that some of the modern DSLR models have the feature to automatically highlight the overexposure by displaying the warning on the histogram graph during the playback on the LCD monitor. When I had my first DSLR, Nikon D60, I experienced that this feature was enabled by default and I could use the Multi-Selector button to display the graph or hide it. But in case of Nikon D90, you have to set it up manually. So, lets go ahead and see how you can enable the feature on the Nikon D90 so that you can determine the exposure level right from the histogram graph. We will also see how you can set the camera to display the color histogram while previewing the photographs.

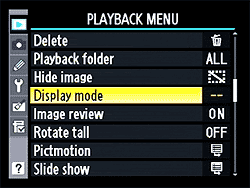
Figure 1 : Display Mode

Figure 1 : Display Mode

Let’s get into the Playback menu by pressing the MENU button on the back of your camera. While you are inside the Playback menu, scroll down to the Display Mode as shown in the picture, Figure 1: Display Mode.

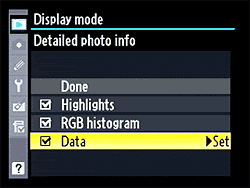
When you click on the Display Mode, you will get three options: Highlights, RGB histogram and Data. All these options inside the Display Mode are disabled by default (on Nikon D90) and you have to enable them individually.

Figure 2 : Set Options

Figure 2 : Set Options

When you check on the Highlight option, it will enable the Highlight Overexposure Warning and you can see the blinking zone right on the histogram graph where the photograph or part of the photograph is overexposed. Second option, RGB histogram, will set the camera to display RED, GREEN and BLUE histogram on the LCD monitor while you are previewing the photograph using the playback button. That means you can now see the pixel values and the concentration of all the colors in the photograph. Last option, Data, will give you the details of f-stop, white balance and other EXIF (Exchangeable Image File Format) data related to the photographs.

I definitely recommend enabling the first option to highlight the overexposed area. And, if you are interested to know further, you can enable them all and see what kind of information your camera is providing to you about the photographs.

NOTE : Even if you enabled these options, you still have to use the Multi-Selector button to view them while previewing the photographs on the LCD monitor.

How To Hold A DSLR Camera?

Holding your camera in a right way matters in photography. Beginner photographers try to grab the camera however it is easy for them. Even though there is no standard written rule to hold the camera, best camera holding technique could lead you to the better shooting experience. I have seen many people holding their camera in a wrong way and the result is obvious; shaky pictures because of the instability of the camera during the shutter release time. Camera positioning and holding is very important point you have to remember every time you go for the shooting. If you are using VR lens for the shooting, minor camera shake doesn't matter because VR (Vibration Reduction) lens is made for that purpose. But it might not be the case always. That's why it is important to be mindful about the camera holding techniques and bring the perfection in your shooting.

When you shoot fast moving subject (sports photography) or do macro photography or night photography, it is always recommended to use a tripod to avoid camera shake. The reason is, you need a quick action, patient mind and sometimes long exposure settings for those kinds of shooting. There is no hard and fast rule to hold the camera and it varies from person to person depending on what kind of camera they are using and what style they are comfortable with. But let me write down some of the techniques that I follow while shooting either handheld or on the tripod.

Camera-Holding-technique.jpg

1. Use your right hand to grip the camera body from the right side of the camera. In this positioning you can use your thumb to adjust the settings by using the command dial and the index finger to focus and release the shutter button.

2. Support your camera specially the lens using your left hand and place it in a proper place on the lens barrel so that you can adjust the focal distance using the lens ring.

3. If you are use the Live View mode to shoot, you can skip this point but if you are shooting using the viewfinder which I normally do, make your body close enough to the camera body so that you can see the subject from the viewfinder comfortably.

4. Use a tripod for better stability of the camera body but it's not necessary always except in a few situations which I mentioned above.

These are the general conventions to hold the camera body and the lens but not the rule. But I believe that if you follow these guidelines, it definitely helps you to shoot comfortably while maintaining your full focus on the subject.