
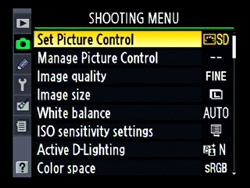
Nikon D90 is the world's first DSLR camera to record HDTV movie with sound. It gives you three different options of recording movies and today we are going to discuss the movie settings menu available in Nikon D90. When you press the menu button on the back of your camera, you will be given different choices of menu settings for your camera. But right now we are interested in a movie settings option and for that, lets go to the Shooting Menu option (camera Icon) and scroll all the way down to the Movie settings menu and click OK. Actually there are not much settings to be done to record a movie with D90 but you can adjust movie quality (frame size) using this menu option and enable or disable the sound recording option. Nikon D90 shoots all the movie clips at the same rate, 24 frames per second. Here are the few options you can set under this menu.
1. Quality
2. Sound (press OK to enable or disable sound recording option)
When you select Quality and enter OK, you will be presented with three framing size options.

Nikon D90 movie settings menu
1280x720 (16:9): This option will let you shoot in HDTV quality movies in the 16:9 aspect ratio. As this mode allows High Quality movie, it consumes more space in your memory card. Main disadvantage of this mode is, it allows you to shoot only 5 min of HDTV movie. But this framing size is best viewed on big screen TV.
640x424 (3:2) : This is the default option set to Nikon D90. This mode allows you to record non-HDTV video as of normal non-HDTV camcorders and best viewed on small size monitor. This setting allows you to record 20 minutes of video. Personally I use this setting to record video with my Nikon D90.
320x216 (3:2): This mode is used to produce compact framing movies and allows you to record 20 minutes long video.
After you set the framing size, click Live view (Lv) button on the back of your camera and press OK to start recording video and press OK again to stop the recording. Nikon made it very easy and simple enough to a record video with Nikon D90.






I primarily shoot landscape and cityscape which requires me to take a long exposure and bracketed shots. Even though there is no hard-and-fast rule, there are few generally accepted practices among the photography communities for the camera controls and the settings, camera and the lens types and the list of accessories one should have to get better results. Usually, combining a full frame (FX-Format) camera with the wide angle lens gives you the best possible frame for the landscape or the cityscape shots. If you shoot with a higher resolution DSLR, you can crop the images, change the composition during the post-processing and still have enough pixels left in them to print in a larger size. If you are more interested in shooting buildings and architectures, you would get better results by using the tilt-shift lens which allows you to move (tilt and shift) the part of the lens in relation to the image sensor in a wide range of directions and gives you the better and more natural perspective of the structure.
Since I stepped into the photography world in 2009, Nikon D810 is my fourth DSLR but second full frame camera after D700. The decision to upgrade D700 to D810 was influenced by the need for a moderately higher resolution camera which was designed and marketed for landscape photography. Over the last 10 years, I have tried and shot in different camera settings and lighting environments. I have traveled to many places to get a good shot and also made countless mistakes repeatedly. I have learned the most from my own mistakes which gave me some invaluable lessons about what to do and what not to do during the shooting process. All these years of mistakes and countless teaching moments gave me my own set of camera controls and the settings to follow. Today, I want to share that information with you and get your feedback if you have any.