Composition

Photography Composition Tips - Combining Elements

This post is written by Guest Contributor, Janet Ochs Lowenbach. If you are also interested in writing a guest blog, please reach out using the form in the Contact page.

Composition is a very important element of photography – it refers to the arrangement of the elements of the photograph – the objects, the lines, the light, the sense of motion. Composition is a general word beyond photography too, and it refers to “The act of composing … or the state of being composed…the union of different things or principles into an individual whole…”

What is important here is that the way you create a composition differs with the art form. With art, you create and combine elements, you generate objects you have developed from your imagination and combine them on the page.

But with photography, the process is more an act of subtraction than creation. The world we look at is too noisy, too filled with parts. The photographer selects those parts that tell a story, create a mood, and draw in the eye, and he discards the rest.  It is not always easy to see the photograph when looking at the world through the viewfinder.

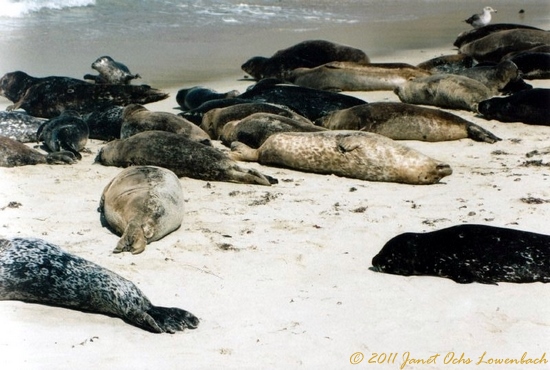
Here is an example. I traveled to view seals off the coast of California. There were many problems with them. They smelled terrible. Most just lay there barking and doing nothing. There was no discernible story or pattern in the scene.

The first photograph shows you what I saw as I neared the cliff.

Seals-off-the-coast-of-California.jpg

The second photograph shows that as I got closer, I eliminated many of the seals, but there was still no message and no impact.

Seals-off-the-coast-of-California-2-.jpg

Finally you see the photograph I ended up with. A white seal (I call him Uncle Charlie) surrounded by a triangular shape of black seals. I walked around the scene, getting closer until I could focus on objects that were combined in a dramatic and pleasing shape and on elements (the triangle) that drew in the eye.

Close-up-shot-of-seals-off-the-coast-of-California.jpg

The triangle grounded the picture. Charlie’s expression was dramatic and caught your eye. It created a photograph from lots of indistinguishable shapes.

Sometimes you see one thing when you take a picture and another after you look at it. I was looking for contrast in the photo, and in this shot Charlie’s shape contrasted with the black seal lifted up behind him.  Bu t in time, the black figure grew in importance; perhaps I had seen him subliminally. He was a giant black, roaring anti-seal, a shape that gave power to the shot.

Perhaps you would like to try this exercise. Take a scene and photograph it. Then walk around and through it and see how you can improve what you see by eliminating unnecessary elements that obscure the power of your photograph.  Feel free to share these with us.

Things To Remember While Shooting At The Beach

This post is written by Guest Contributor, Janet Ochs Lowenbach. If you are also interested in writing a guest blog, please reach out using the form in the Contact page.

When you take out the rafts and sun hats, don’t forget to bring along your camera, because summer is an excellent time to take beach scenic shots. If you choose the right time, and are careful to protect your camera from the elements, you can get some beautiful photos to add to your portfolio and your wall.

First: the warnings. Sand and salt spray can play havoc with your camera, so use your head.  Don’t open your camera any more than you have to: change your memory card at home. Keep your camera shaded under a blanket or umbrella not like a sitting duck baking in the hot sun. Don’t change your lenses at the moment your friend is shaking out a towel. And if sand or salt get in, immediately and carefully attempt to blow it or wipe it out.  If you are not sure you have removed the offenders, take your camera to your repair shop.

If the weather is too harsh, consider leaving your camera at home and bringing a sealed disposable or simple underwater camera. Or, you might use a plastic bag over the camera body drawn forward and secured around the (open) lens with a rubber band.

Be careful with the lighting. Beach (and snow) scenes are so bright they fool the camera into underexposing.  Do set the exposure properly either by reading off your hand or an 18 percent gray card and shooting on manual. Or simply open up one or two f stops to increase the light. You can check the pictures on the camera back if you have a digital camera and compensate accordingly.

Don’t just stand there and shoot into the waves: Look for different ways of seeing, other kinds of lines that lead the eye to the subject, and different ways to revealing the subject. Ask yourself what story you are trying to tell about the waves —are they symbols of a gentle nature? A ferocious adversary?  Then try to demonstrate your answers.  You've been unaccustomed to thinking like this, but such thinking will help you produce out-of-the-ordinary pictures.

Look for the quality of light. Don’t go out at noon and blast away. Go out in the early morning even before sunset or in the late afternoon, when the sun is low in the sky.  At night, you will find a warm, reddish light that makes your photos glow with fire and emotion.

Composition is important. You don’t want your subject smack in the middle of the photo. Picture a tic-tac-toe grid over your viewfinder. (This is the rule of thirds.) You want your subject not in the center but at one of the points where the lines intersect.

Shooting-at-beach-2.jpg

Walk around the shot, face the waves, move closer and shoot sideways so the water fills the frame and you have land and water as the background. Shoot small things — the bubbles in the water as it pours over the shore, footprints on the sand, a dried out crab shell. Look and look and try to find something different, something that speaks to you and helps you speak differently to the audience.

In the pictures below, I encountered a log on the shore — unusual for the scene and a way to vary the lines and the lighting in the photo. In the first shot, it appears in the lower third of the photo to the left. In the second it is backlit and appears in the lower third to the right. The lighting is pastel.

Shooting-at-beach-3.jpg

The third shot attempts to show the power of the waves.

Shooting-at-beach-1.jpg

Sometimes unexpected things happen, as when my dog ran into the picture. If you expose for and set up a scenic shot, wait for a minute. A bird may fly across the sky; a person or dog may run across the view. This can only make things better.

The Rule Of Thirds In Photography

If you are into photography world, you should have heard the term "Rule of Thirds" by now. And if you are here reading this blog, that means you want to know more about the rule, right? When you are taking any photography courses or learning the basics of photography, you should have come across the term at least once. It is probably the most well known and the widely talked principle of photography composition. Even though it is one of the few rules for composing photographs, it is not necessary to follow the rule of thirds every time you shoot. Sometimes you may produce an excellent shot without the rule being applied and sometimes the rule may come handy to make your picture look more appealing to the viewers. Sometimes, photographers who know already know about the rule, breaks the rule and apply their own. I do not disagree with this argument and sometimes rules are meant to be broken.

But if you want to break the rule, it is important to know more about the rule that you are breaking and find out what kind of impact would the rule have made into your photographs. You can't just say that I am breaking the rule of thirds in this photograph without knowing what the rule of thirds is about. I have not necessarily followed the rule myself every time when I go out and shoot but sometimes applying the rule had made really big difference on how the picture draws the viewers attention into it. Let’s talk briefly about the rule first, and then you can apply it in your composition or break the rule if you find it necessary for the photograph.

What is the Rule of Thirds?

Rule of Thirds is a photographic composition principle where you break down your photographs into a third, both horizontally and vertically, like a tic-tac-toe board so that you have a total of 9 equal boxes framed inside the photograph. While you are composing the shot, you would imagine these boxes in your mind while watching through the viewfinder. After you draw the rule of thirds grid on your mind, it gives you few important parts (four intersecting points and four lines; horizontal and vertical) of the photograph where you should consider placing the point of interest so that the viewers find the picture more attractive and natural. Some of the DSLR cameras come with an option to have a actual grid displayed on the viewfinder screen while composing the shot. And as you practice more and be comfortable with composing the shot according to the rule, you can remove the grid display from the viewfinder (if it is distracting) or continue to use it if it is helping you to compose the shot.

ruleofthird.jpg

The theory behind the rule of thirds is when you place the point of interest of the photograph on the intersection points or along the lines, photograph will be more balanced and look natural to the viewers. It makes the use of natural tendency of the human eye to be more strongly drawn towards these intersections rather than to the center of the shot.

When you shoot portrait photographs, eyes are the natural focus point and you should consider aligning the body to one of the vertical lines. Usually, same is true for the wildlife photography as well with some exception.

Portrait-rule-of-thirds.jpg

Likewise, when you are shooting landscape, it is a good practice to position horizon along with one of the horizontal lines so that the picture look more structured and well balanced.

Lincoln-Memorial1.jpg

Even if you can't frame the subject using the rule of thirds during the composition, it may not be that big of a deal nowadays thanks to the high resolution digital cameras and the varieties of the post processing tools available in the market. While you are editing the picture on the computer, you can display the rule of thirds grid during the cropping process and can also drag the grid around to place the point of interest according to the rule and crop the image once you are satisfied with the composition.